SCHEDULE YOUR COMPLIMENTARY CONSULTATION

SCHEDULE YOUR CONSULTATION

"*" indicates required fields

This field is for validation purposes and should be left unchanged.
Optin

"*" indicates required fields

This field is for validation purposes and should be left unchanged.
Optin
San Clemente Kitchen Remodel Case Study

San Clemente Kitchen Remodel Case Study

Remodeling can be exciting, fun, exhilarating, and terrifying all at the same time.  After all, this is your home where you feel safe, have doors and locks and only invite friends and family in. Now you’re inviting strangers to come in and take a sledge hammer to what may be your largest single investment.  We wanted to document a recent San Clemente kitchen remodel from start to finish to share with you the process; from the process fundamentals to the designer’s plan, and the builders execution.  Join us on this journey where we diary the remodel of a San Clemente kitchen remodel.  We will share weekly updates with you as we swiftly design and build this client’s new kitchen.  We’ve employed time lapse video so you can watch each week without having to sit through hours of video.

Starting the Kitchen Remodel Process with a Design Session

The first step in this San Clemente kitchen remodel was the client calling in to ask for her complimentary design consultation. Our Director of First Impressions does a short interview with the prospective client to determine a best fit kitchen designer. Best fit means location of the job as you’d like an expert in construction from the area as well as personality fit.  Our designers design to your style by collaborating closely with you through the design phase of the remodel.  In this case, Sea Pointe’s designer, Janna went out and met the client to learn about their kitchen remodel needs.  This first design consultation includes an informal interview where Janna and the client get to know each other. This includes asking for designs the client likes versus design styles the client does not like. We ask clients to take a look at our kitchen remodeling portfolio and share 3 designs they like and 2 designs they do not like; Janna then asks specifics as to what aspects of each design does the client like and not like.

Janna then takes measurements of all of the spaces the client is interested in remodeling and continues with her interview process to learn how the family uses their kitchen space. For example she asks if they like entertaining, where do you spend Thanksgiving, do you host dinner parties, game nights, as well as how often you cook for your family. Janna found out this family had children growing into their tweens that are now using the kitchen on their own as well as they help out in the kitchen. You’ll find this detail had a big impact in the design recommendations Janna made.  With sheltering in place orders, the kids are now spending more time at home and doing their school work at the dining room table. This is another detail that had a big impact on the remodeling design options. Through the interview process, Janna was able to determine that many options were not necessary for this family, such as a pot filler as they do not cook pasta or potatoes or rice much.  And many details you may not notice immediately were determined to increase the beauty of the space while not limiting the function.  The client showed Janna pictures that were light and bright and expressed interest in some on-trend design elements.

Kitchen before kitchen for remodel

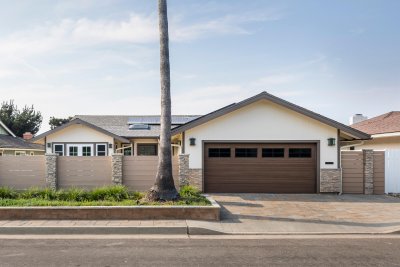
As you can see the starting point from the “before” picture that it’s still a very nice kitchen, just using some cabinetry, countertops and flooring that are a little dated. Typically clients ring us up when they need a new configuration to make better use out of the space or to freshen up the design with a professional designer’s eye. In this case, the client wanted both of these services. The small kitchen island was not providing as much value as it was causing traffic jams in the kitchen with a family of four.  Janna  recommended opening this space up for better flow and add a peninsula to have more counterspace as well as provide extra seating. This enabled the kids to also have additional space to do their homework.  There’s a butlers’ pantry between the dining room and kitchen that the client wanted to match the new décor and add a beverage center.

Design Agreement Meeting at Our Design Showroom

Janna scheduled the next design agreement meeting to have the client meet her in our Design Showroom where she can see all the materials we have to choose from as well as plenty of design inspiration.  She leaves the client’s home after an hour and 20 minutes with everything she needs to present a design proposal to the client a week later. Janna gathers pricing on kitchens of similar size and project scope; meaning she looks for jobs we have recently completed that also have an island removal and peninsula addition with similar cabinet layout / number of custom cabinets designed and built as well as countertop surfaces.  Janna compiles the similar jobs with before and after photos, black and white cabinet elevations, and 3D color renderings to show you what is included in the design phase of your remodel. She now puts a price range together based on the previous jobs she is using to build your design proposal. The client thought this was a good fit between her family and Janna as well as the Sea Pointe Design & Remodel design build construction delivery model. At this point in the kitchen remodel process, the client provided a design fee to Sea Pointe so they could start the design process.

Floorplans for Your Kitchen Remodel

The first thing your designer does after the design agreement is to ask you for your as-built plans. This is the current floorplan of your existing kitchen. If you do not have your as-builts, we will draw them for you. These are important communication tools that Sea Pointe Design & Remodel designers, project managers, and tradesmen use to ensure everyone has precise measurements and one source of agreement. The as-builts are also used to start drawing your new floorplan. In this case, the new floorplan has the removal of the island and the addition of a peninsula.  Below you can see the as-built and new floorplan side by side.

As-built plans with proposed plans

Designing Your Kitchen with Your Kitchen Designer

The next step is for Janna to gather color palettes and design ideas to the client so she may pull some materials to review with the client. During this time, Janna is reminding the client of the design budget range and providing materials in that range. Often times during the design phase, we encounter what we call, scope creep. It’s very exciting and fun to design your new kitchen remodel, but it can get out of control with fun and you find your final pricing not so fun. It’s this reason that Janna is protective over your budget to keep you in between the pricing rails discussed.  Should the client decide they want to add onto the project, we will gladly accommodate and provide the pricing separate from what was agreed upon in the initial scope. This client kept to their original plan with the exception of using a beautiful solid slab backsplash which necessitated a more complicated electrical plan to hide the electrical in the cabinetry enabling a continuous slab to be used; this makes the space feel larger and luxurious.

Once the materials are selected, Janna works with our cabinet designer to lay out all of the materials into a cabinet plan. These contain very specific details on the cabinet types and measurements. There’s more detail than you may consider in ordering cabinets and these are the most expensive part of your kitchen remodel and why it’s so important these are accurate. This client selected two-toned custom Omega cabinetry with white Renner- Beach House (door style) cabinets on top and chestnut Renner on bottom. This client had stacked cabinets on the upper enabling Janna to infuse more light into this kitchen with 11 glass door inserts with backlighting to illuminate the white cabinet interior.  The client decided to go with upgraded countertops and selected Taj Mahal Quartzite.  The client also selected a fantastic laminated vinyl plank flooring that is practically indistinguishable from natural wood and much more easy to maintain; Gemcore Manhattan series in Topaz.

San Clemente Kitchen Elevations

cabinet elevations

Once the client approved the black and white elevations, Janna will commission the 3D color renderings to be designed by one of our talented cabinet designers.  These elevations are very close to photo like realistic and a great place to make changes on paper and not in the field. The 3D color renderings are another communication tool we use to show the client what their remodeled design looks like. These renderings are true-to life with windows and existing structures that will remain. Often times at this stage in the design process, clients are able to see their material selection come to life and identify material changes. It’s much more affordable to change at this stage rather than after materials have been purchased.

3D color renderings for kitchen design

3D Kitchen color renderings

The client loved the design Janna showed her in the above 3D color renderings. The only item she wanted to change out was the pendent lighting and that was an easy change.  We swapped out the pendant lighting to the new lighting selected and the client gave us the green light that she was happy with the design. We love making clainets happy!

Your Construction Agreement

The next step when working with a design build firm is for your designer, Janna in this case to price out every item that was selected as well as all of the construction materials that go into the job. This includes all of the demo, dry-wall, flooring, lighting, sink, faucets, cabinetry, plumbing, electrical…down to every single nail that will be needed for your job. This takes any unnecessary surprises out of the remodeling process. Janna prices the whole project out in a construction agreement.  This is the price you will pay for your all-inclusive project. Every detail is laid out for you so you know exactly what you are paying for before signing an agreement.  Upon reviewing the agreement, the client signed the construction agreement and gave us a deposit.

Upon getting the deposit, Janna starts coordinating with your project manager to procure your materials and ensure all the materials are available on the job site the day they are needed. First comes your cabinet order which has a 6-8 week lead time to build your custom cabinets and have them delivered. While the purchase process is occurring, your PM is also submitting your plans to the city for permitting. Due to the current COVID precautions, permitting may also take longer than normal. Your PM is also coordinating demo dates with one of our skilled demo teams and coordinating the tradesmen and when they will be needed on the job.

Kitchen Remodel Kickoff: Job Walk

The next step in the process was to review the project plan with the client, the project manager and Janna. This is where we do a job walk with you to review the project and all the very important details necessary to work in your home every day. Items like children’s names and must-know allergy issues, dogs names, escape artist pets, nosy neighbors and anything else we will need to work along side your family in your home. You will get important dates and project details to prepare for during this meeting.

Demolition Day

Next step is demo day – removing all of the old and leaving just the bare bones. This is always a happy day for clients and this family was no exception – getting rid of something that has been bothering you for years has an extremely freeing feeling that we often hear from clients at this stage of the remodeling process.  Below you can see week one demolition. Notice how clean our crew leave the jobsite every single day.

Kitchen Remodel Construction Begins

Once the demolition is done its time to do the necessary rough ins to support the cabinetry. We ensure your insulation is not damaged and in tact. We need to do any electrical install for wiring needed after cabinet installation  Due to no visible outlets, you’ll notice quite a bit of electrical coming from the ceiling for the in cabinet lighting. The next step is to install the drywall by nailing the sheetrock panel to the framing and then drywall joint tape is applied to the seams between each drywall panel. Once the seams are all taped up, the crew applies the joint compound on top of the sheetrock. This is left to dry for approximately 24 hours. Once it’s dry the crew starts the drywall sanding process. This is not a fun time with dust in the air, but we do have excellent plastic walls with zippers to prevent as much dust as possible from escaping into your living area.

Drywall installation in Kitchen remodel

After the drywall sanding is done, you’re ready for your coat of primer and paint. Next step is cabinet installation – let’s start making this kitchen take shape with the beautiful custom cabinets that were delivered just in time for installation because we ordered them before we started demolition or even pulled the permits. Ahhh the joy of perfect planning is why design build is often a choice of construction delivery for very busy professionals.

The next step after the cabinet installation is the sink template. The installers will use a jigsaw to cut out the sink template in preparation for the countertop installation.  Once that is set, the Taj Mahal quartzite countertops are ready to be installed. While this material is extremely heavy and awkward to handle, the installation is simpler than most folks think. The installers use adhesive to bound the countertops to the cabinet boxes.  Sealant is used around the sink joint and around the plumbing fixtures.

countertop installation

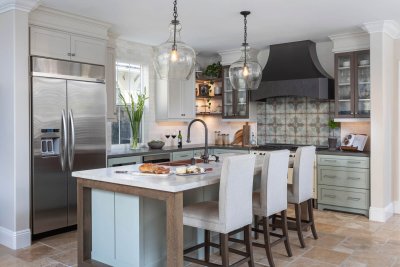
Kitchen Remodel Photo Shoot Reveal

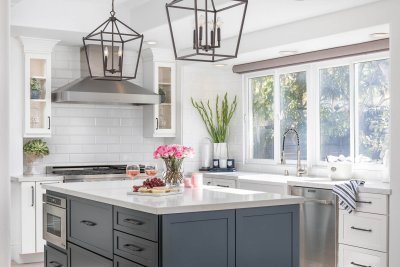
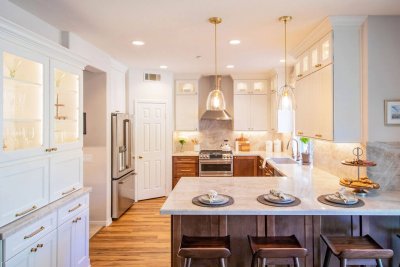
Finally the cabinet hardware is installed and lastly the flooring is installed. All this happened over an 8-week period. Below you can see the finished remodel in our San Clemente Kitchen Remodel photo shot reveal.

Kitchen-remodel-San-Clemente

There are so many beautiful details to take in from the stunning photo shoot reveal. Don’t forget this project came with a butlers’ pantry remodel as well. To see the complete San Clemente kitchen design and remodel reveal, click here>>

Let's Discuss Your Next Project!

"*" indicates required fields

This field is for validation purposes and should be left unchanged.
Name*
Project Type
Text Checkbox*

We guarantee 100% privacy for all information!

San Clemente Kitchen Remodel Case Study was last modified: December 18th, 2025 by Smart Marketing
How to Design Your Kitchen Remodel

How to Design Your Kitchen Remodel

How to Design Your Kitchen

Selecting the Right Kitchen Design Partner

Deciding to remodel your kitchen is a big decision. Not only are you going to take a wrecking ball (okay a sledgehammer) to your current culinary retreat/ heart of your home, but you’ll also be inviting strangers into your home to help shape your future kitchen design and function. This includes a hefty investment in your home, so be sure you partner with the right firm and understand the important questions and details you should know as you approach a kitchen remodel.  For a complete list of resources to ensure you’re partnering with the right remodeling firm, check out this handy remodeling firm reference guide.

Remodeling Your Kitchen with Design Bid Build versus Design Build

When asking clients what the most important part of selecting a kitchen design and remodeling firm is, most folks say trusting the builder. There are over 600,000 contractors across the US.  Approximately 66% are Design – Bid – Build (DBB) firms which is how contracting has worked for decades; this is where the homeowner hires a designer, draftsman, and general contractor and does the project management of the remodel themselves. The Design Build (DB) model is approximately 44% of the firms remodeling in the US. This is where the designer, project manager, and contractor are all under the same roof and the same construction agreement.

The design build approach to designing your kitchen remodel ultimately delivered happier customers, according to the Fails Management Institute. Their research reports that homeowners enjoy the collaboration piece with flexibility to impact the project. Seventy-six percent of owner respondents to FMI’s survey rated their experience with DB as “very good” or “excellent.” They cited increased opportunities to innovate and the ability to fast-track a project as the top two benefits of DB.

Planning Your Kitchen Design & Remodel

When selecting a design build firm like Sea Pointe Design & Remodel, your designer will walk you through the whole process to ensure you know all the options available and in what order we will design your kitchen remodel. We will start with some, “get to know you” basics by asking you to share design inspiration pictures from our kitchen remodeling pictures / portfolio as well as to select a couple kitchen designs that you do not like.  This helps your designer zero in on your style and identify themes in your preferences.

Space Planning for Your Kitchen Remodel

Next your designer will ask you about your space – is it the right size? How many people cook at once in your kitchen? Do you enjoy entertaining? Do you use your kitchen for other purposes like crafting, gaming, working, etc.  Do you need extra kitchen dining space in addition to your dining room space? These questions will help you and your designer decide whether walls need to be moved, island added, peninsula removed, etc.  While your designer identifies your kitchen use and needs patterns (during your complimentary design consultation), they will also take preliminary measurements so that your “as-built” blueprints may be created.

Custom Cabinet Layout for Your Kitchen Remodel

Custom Kitchen Cabinet LayoutNext step in how to design your kitchen remodel would be the cabinet layout. This may be the most complex part of the remodel with all the options for configuring custom cabinetry and semi-custom cabinetry for your kitchen remodel.  There are over 40 options to customize your kitchen cabinets. Your designer will show you all the options right for your needs; microwave drawers, built-in refrigerator, fridge drawers, built-in ice maker, roll-outs, spice rack inserts, utensil inserts, and many more.  Each cabinet will be documented down to the ¼” with a unique identifier for ordering.  Also keep in mind that so far, only function has been addressed.  The color and style of your custom kitchen cabinetry has yet to be identified.

Designing Your Kitchen Remodel Color Palette

Next your designer will select color palettes and design options.  Part of the magic of the professional design process is the designer’s ability to provide minimal options while giving you exactly what you want.  As we all know, too many options typically result in decision paralysis.  Your designer will gather up 3 color palettes that suit your previous inspiration pictures – they may also ask you to join them in the  design showroom to select a few tiles and countertops yourself so they can incorporate these specifically.

Kitchen design color palette option

Kitchen Countertops & Backsplash Design

Now that your professional kitchen designer has nailed down your color palette, your attention will be narrowed down to patterns and materials you will need to select for your kitchen design.  Do you want quartz countertops, granite countertops, wood, glass, or marble countertops? What type of backsplash strikes your fancy? Do you like subway, patterned, glass, metallic, or a combination of these to build texture and intrigue in your kitchen. Your designer will also provide materials precautions; for example, no one that eats or drinks should own marble as everything stains it. You may not want a shiny backsplash behind your stove top as splashes and cleaning become daunting.

Kitchen remodel with patterned backsplash    Textured stone kitchen backsplash    Mirrored Kitchen Backsplash  Patterned tile backsplash  Blue metallic backsplash makes big splash in kitchen remodel.    Oceanesque backsplash

Selecting Plumbing Fixtures for Your Kitchen Remodel

Next, you’ll move on to plumbing fixtures for your kitchen. These are the details that can bury a non-suspecting home remodeling shopper; with millions of faucet styles, finishes, and features, our designers will help you eliminate a lot of the noise and present the best options for your needs. The finishes alone include gold, brushed gold, silver, brass, chrome, stainless steel, nickel, brushed nickel, and bronze to name a few. Do you want a farm sink undermounted? Do you want an overmounted sink? Do you want a center divider and what material would you like? Take a breath, the joy of design build is that your designer makes these kitchen design decisions easier.

Stainless steel kitchen faucet    Gold kitchen faucet for kitchen remodel            Matte black plated brass faucet

Kitchen Remodel Design & Lighting Options

The next part of designing your kitchen remodel is your lighting. Where is the lighting coming from and what type of lights are they? You’ll need general lighting which traditionally is canned lighting so you can navigate in your kitchen.  And for décor and design sake, you’ll typically select a type of hanging light or pendent lights to compliment the design you have developed to this point.

3D Color Renderings

Once you have agreed to the countertops, backsplash, cabinet style, and cabinet color, your designer will commission the 3D color renderings that will enable you to envision the materials selected in your kitchen as it will appear after the remodel. This is an integral communication tool to ensure that both the designer and homeowner are on the same page with the design.  It’s at this time that the client has the option to change out materials before any purchasing has occurred.  Often times this is where homeowners change out their kitchen backsplash as they could not visualize it in its enormity until the rendering.  They may change entirely or merely cut back the space in which the backsplash will be used.

Designing your kitchen remodel with the help of a professional kitchen designer

Upon all renderings being approved, your design is official and it’s time for your designer to start calculating all the measurements by cost for materials ordering. Your designer will document the costs in your contract to ensure you know exactly what your kitchen design and remodel will cost prior to signing your construction agreement.  Upon signing your construction agreement, your designer will start the wheels in motion to get your project under construction.

Next steps for construction ramp up is obtaining the permits from your city building and permit department. Immediately following this will be your lead and asbestos testing (100% required in all California remodels). Upon successful completion of these tests, your project manager will walk you through a comprehensive construction plan so you are always on the same page and know who to contact at all times for project needs while under construction.  Some of these details include how to enter and exit the property, kids’ names, pets names, demolition and construction schedules, material delivery location, and remodel milestones.

How to Design Your Kitchen Remodel

Next stop is your dream kitchen. You’ve made many selections, hard decisions, financial commitment and now drum-roll please… Your kitchen will be remodeled and unveiled to you and your family within 6-10 weeks, giving you a space you LOVE every day.

More Reads: >> San Clemente Forever Home: Double Decker Addition


Let’s Discuss Your Next Project!

  • This field is for validation purposes and should be left unchanged.
  • We guarantee 100% privacy for all information!

How to Design Your Kitchen Remodel was last modified: December 18th, 2025 by Smart Marketing
San Clemente Forever Home: Double Decker Addition Employs Universal Design

San Clemente Forever Home: Double Decker Addition Employs Universal Design

This San Clemente client enlisted Sea Pointe Design & Remodel, to design and build their home to be the home they live in forvever; this means a home they can age gracefully in with whatever may come their way.  They wanted to ensure this home would enable them mobility even when their legs are no longer mobile.  They wanted this to be their beautiful beach home that increased the value of living by the beach by seeing more of it, right from their home.

Sea Pointe Design & Remodel’s Designer and Certified Againg in Place Specialist, Mike set out to identify everything this retired couple would need in their home.  Mike also has plenty of experience working with this hillsides on the south side of the freeway in San Clemente, so he was familiar with plenty of the zoning requirements and what you can and cannot do in this area. BONUS!  This saves a lot of time with trial and error submittals to the city for permits.

Below you can see the As-built blueprints for this home.  This is a 3 bedroom, 2 bath home with a small enclosed kitchen, living room, and small deck / backyard that rested over an open hill with ice plants facing the street behind their home. The home’s existing footprint was 1,350 square feet.

San Clemente Remodel Floorplan

The designer set out to get the client’s comprehensive wish list so he can ensure he not only delivers what they absolutely want and need but it also gives him an understanding of who they are, their lifestyle, and how they use their home.  This is an essential process that serves as a tool for Mike to also suggest design and engineering enhancements that will improve the functionality and beauty of the home in ways the homeowner may not have considered since they don’t design and build for a living.

Another benefit of using Sea Pointe Design & Remodel is that we are a Design Build firm; this means that all of your construction professionals are housed under one roof.  When you use one firm to remodel your home, it gives you the advantage of sharing information across skill sets which can save you money. Traditional construction firms would be sharing information across different construction companies; in a traditional construction company set up, you would hire your draftsman / architectural design, your interior designer, and your contractor separately.

When all of your construction professionals are under one roof, we can provide value engineering.  This means that your architectural designer and your structural engineer can identify construction effiencies where leveraging existing architecture can save you time and money. And what homeowner would turn that away?!  That’s exactly what we / Mike did with this San Clemente Room Addition client.  While they knew they wanted a room addition to give them the space they needed, they expected they would need to eat up their entire front yard to get sufficient space for their whole home remodel wish list.

Mike reviewed their wish list with a functional design eye:

  1. Wheel chair access through the whole home and backyard
  2. Open-concept kitchen with kitchen island
  3. Repurpose a bedroom to an office with built-in desk and shelves
  4. Deck expansion that has been a popular project in this part of San Clemente
  5. Bathroom safety measures with grab bars
  6. More light throughout the home

He noted that he can accomplish this with a lot less space than the clients considered and he could offer some additional value in that space that would include:

  1. Two additional sets of french doors (1 in the kitchen to the front patio and 1 in the bedroom to the back deck)
  2. Double walk-in closets in the master
  3. Additional access door to the back deck from the garage
  4. Additional access to the deck from the 2nd bedroom
  5. Walk-in tub in the master
  6. A skylight in the entry way
  7. Dual office entry
  8. An optional additional deck, giving these clients a double decker view of the Pacific Ocean without leaving their home.

The clients were ecstatic with the design suggestions and proceeded with the idea that they could cut back should the pricing of all of this exceed their budget.  Below you will see the new floor plan with the space additions called out in blue with a red dotted line.  You can see the additional French doors, and barn door accesses to the deck called out in yellow.  The new space additions increased this home’s footprint to 1,850 square feet.  Reminder, you only pay additional taxes on the increase in livable space; in this case 500 square feet.

San Clemente Room Addition

Below you can see the expanded bedroom space zoomed in so you can see all of the features that were added to this space.  This space is very personal and when designing for your forever home, you need to consider that eventually you may be spending a lot of time in your bedroom resting.  Mike is a Certified Aging in Place Specialist and ensured this room has everything they need to make it enjoyable, beautiful, and comfortable for years and life-changes to come.

San Clemente Design & Space Planning

The plans reviewed so far have been space plans that show where the walls will be removed, where new walls will be placed, and cosmetic changes to the floorplan.  Some of the behind-the-scenes engineering that goes into room additions and deck additions is retrofitting your existing architecture to support the additional architecture that is being added on; new architecture can stress different contingent elements of your home that you may not consider as the engineering is hidden under your flooring, under your foundation, and in your walls.

Below you will see the number or reinforcements that were necessary to support the additional structure.  The additional footings are highlighted in yellow on the below plan.  Footings are under your home’s soil by a minimum of 12 inches pending the weight and dimensions of the additional structure.  The charcoal shading is reinforced by a grade beam.

Structural engineering for room addition

Now that the not-so-fun cost elements are understood, you can feel safe that the reinforcement is there for the safety of your home investment as well as personal safety.  These reinforcements will be inspected by the city just like the rest of our home remodel construction work so you have a 3rd party auditor ensuring you that your work has been done correctly and that both you and your investment are safe.

The next step in the design build process is the black and white elevations that show you where your cabinet placements go, what your home elevations will look like from the outside and inside so you can be sure that everything you have designed cabinet-wise is where you want and the style you want.  You will find with Aging in Place Design method, also known as Universal Design is that you will want more drawer storage than traditional cabinets that you need to bend over to see in.

Below you will see the kitchen cabinet elevations to see how they anticipate their kitchen to look once its finished.  Each number on the cabinet references specific wood species, color, and finish.


Main Kitchen Wall on South Side of Home Remodel

San Clemente Kitchen Cabinet Elevations

Alternate Kitchen Wall Across from Main Wall

Kitchen cabinet elevations

French Doors at End of Kitchen with Side Windows for Mass Light

French door elevations

Front of Kitchen Island with Microwave Drawer and Storage Drawer

San Clemente Kitchen Island Elevations


Once the clients approve all the black and white design elevations, it’s the super fun part of the remodeling planning process and that’s the 3D color renderings.  This is where you get to see all of the materials you have selected in your design as it should be designed.  This is the aha moment for most homeowners that have challenges visualizing what the finished product will look like.

We take all the materials and place them just as we have designed your space.  Specifically, for this double decker San Clemente remodel, we will be looking at the 3D color rendering of their kitchen as it should look after remodel.  You will notice that these are extremely detailed to show reflections and true exterior conditions. This process enables us to save money on paper and not find out that you don’t like the backsplash once you see it in its expansive design space.  This is often where clients will change out accent pieces like lighting pendants, backsplash, or flooring.

Main Kitchen Wall on South Side of Home Remodel

3D color rendering of San Clemente Kitchen design

Main Kitchen Wall on South Side on Home Remodel (Closer to French Doors)

3D color renderings for San Clemente kitchen remodel

Alternate Kitchen Wall Across from Main Kitchen South Wall


Alternate Kitchen Wall Across from Main Kitchen South Wall rendering

Full Kitchen View from Entrance of Home Remodel

3D color rendering for Orange County kitchen remodel

Once 3D color renderings are finalized and approved, materials ordering starts and the job start date is assigned.  We never want to start a job without your materials being available for installation. This is another great differentiator between traditional contractor and Design Build firms.  When you hire a general contractor and project manage the job yourself, you are in charge of making sure the materials are available for installation on the day your general contractor needs the materials for the area of the home he is working on that day.

For this project, we want to also show you how we designed the double decker decks off this San Clemente hillside to give this client views you dream of.  Breathtaking is an understatement as well as the space this adds for entertaining is quite spacious.  These clients could host a party with 75 guests purely outdoors.  And due to the design of this home, the clients can usher guests from their front patio entrance straight to the back deck without having to have 75 people trapse dust and debris in on their shoes.  Below you can see the original space for their backyard.

Before pictures of double deck remodel

The structural plan below shows the original deck with the proposed deck on level one and the secondary deck accessible via spiral staircase braced on to the exterior of the master bedroom and the first level deck. You can also see the additional footings that were necessary to support the additional structure and its capacity based on square footage.

San Clemente Structural Engineering

And here you can see that Sea Pointe’s designer has a grand vision for a patio overhang on the top level much like the bottom level; the city of San Clemente had other plans as this was not permitted to be built at this level, so you will note the final photos and videos do not have the patio cover on the 2nd level deck.

You also will notice that the plans extended out further over the hill behind the home giving this couple space for their reclining chairs and entertaining area.  This lower level deck has the capacity to support a lot more weight than it needs based on the square footage capacity.  This lower level deck can host up to 75 family and friend members.  The lower level deck also has motorized retractable screens making dining fly free, dust-free, and shady when wanted.  The patio cover also features built-in speakers, built-in heaters, and lighting; you will want for nothing with this structure as your haven.

3D color deck renderings

Now that you have seen the process of enclosing a couple different spaces to lay out your home in an entirely new functional option,  you can truly enjoy the after pictures captured below.

Lounging-Area-Home-Remodel

San-Clemente-Kitchen-make-over

San Clemente Hillside Deck Addition

San-Clemente-Living-Area

San-Clemente-Dining-Space

To see the whole home remodel portfolio with Universal Design features, click here>>


San Clemente Forever Home: Double Decker Addition Employs Universal Design was last modified: December 11th, 2025 by Smart Marketing
5 Functional Features You Need in Your Kitchen

5 Functional Features You Need in Your Kitchen

5 Must-have Kitchen Features

Doing your research before remodeling your kitchen? You have come to the right place! When planning your kitchen remodel, we suggest taking advantage of the potential space your dream kitchen has to offer. From creating more hidden storage space to access for easy clean ups and organization tactics, a functional kitchen is necessary in today’s world, especially with many of us spending more time at home during Covid-19. Read on to find out what five functional features you need in your kitchen remodel.

#1: Integrated Dishwasher

Integrated-Dishwasher

When doing research on gathering inspiration for your future kitchen remodel, you may come across terms like “built in” or “integrated dishwasher.” Well, what does it mean by built in dishwasher? This is when your dishwasher blends in with the rest of your kitchen cabinetry serving great function as well as looking more pleasing to the eye!

A trending example would be to build this into your kitchen island near your sink, allowing for easy access and functionality when having family members or guests gathered around after a nice meal.

#2: Pull-out Garbage and Recycling Cabinet

Pull-out-garbage-cabinet

Incorporating a pull-out garbage and recycling cabinet serves a very similar function! Designing this to include in your kitchen remodel allows for very easy cleanup when cooking or doing your dishes. Your pull-out garbage cabinet will also blend in seamlessly with the rest of your kitchen design. Also, no more pets having access to sneaking in that trash can!

#3: Pull-out Spice Rack

Pull-out-spice-rack

We are a sucker for great organization in the kitchen! Make organizing guru, Marie Kondo proud by including a pull-out spice rack in your dream kitchen. Also hidden to blend in with matching the aesthetic of your kitchen design, this serves as great organizing function when storing your cooking spices.

Utensil-pull-out

This can also be used for a utensil pull-out for better organization. This would be perfect for someone who likes to cook a lot. You would be able to have all the cooking utensils you need right in front of you, so you don’t have to worry about reaching or walking far to grab them. When everything is organized better, you also don’t have to waste time looking for the right thing you need.

#4: Pantry Shelves

Pantry-shelves

Kitchen storage is such an important factor when remodeling. Adding pantry shelves allows for more organization space and easy accessibility. These can even be custom built according to the size of the items you decide to store in your pantry. Believe it or not, incorporating pantry shelves can also save you money! When you are more organized and know where everything is kept, this will prevent you from buying the same snack or ingredient multiple times.

#5: Kitchen Island

kitchen-island

Kitchen islands are a must these days to include in your remodel. They provide massive function potential from having seating space, to storage space, to allowing more time with your family! Your kitchen island with seating can incorporate a bar area, opening more space for larger gatherings or just an intimate space to eat or have a drink.

cabinets-drawers-in-island

Don’t forget that you can include cabinets and drawers in your island. This creates more space for storage as well. This would be great for storage from your pots and pans to presentation plates and serving trays. Just imagine how much room this would open up for you! You could even place kitchen items that you would normally sit on your counter, that you don’t use too often, which would make your kitchen look less cluttered overall.

sink-in-island-kitchen

Also serving great function, having a kitchen island sink built in, will give you more preparation area to work with. Whether you would like dual sinks in your kitchen, or just plan to have one main sink, this is the best location to put it when you’re considering functionality. When having Thanksgiving dinner or family gatherings, this will give you the opportunity to stay in the middle of all the action, so you don’t miss a thing!

Now that you have done your research, if you are ready to make your dream kitchen come to life and are in Orange County, give us a call at (949) 861-3400 to schedule your complimentary design consultation. Our designers will work with you to ensure that your kitchen remodel needs and wants are heard, especially when it comes to building custom features! To learn more, we highly suggest signing up for our weekly webinars, held on Thursdays at 11 a.m. by clicking here. Let’s start on that dream kitchen of yours!

Let’s Discuss Your Next Project!

  • This field is for validation purposes and should be left unchanged.
  • We guarantee 100% privacy for all information!

5 Functional Features You Need in Your Kitchen was last modified: December 18th, 2025 by Smart Marketing
Kitchen Island Design Guide

Kitchen Island Design Guide

Kitchen remodel featuring stunning kitchen island.

If you’re planning a kitchen remodel, chances are good that you’re also wanting to include a kitchen island in your design. Kitchen islands are a popular element in the modern kitchen, but must be planned and designed properly in order to be as valuable to your home as it is beautiful.  Many people are not aware of the many options available in a kitchen island; the amenities are endless so we’re here to help you navigate these kitchen island options.

Benefits of a kitchen island

Ultimately, a well-designed kitchen island can have many functions and help solve storage and workspace issues. Here are some of the most common advantages to having an island in your kitchen:

  • Enhanced food prep work area – A kitchen island with the right features and in the right place can make food prep and cooking so much easier. A built-in sink, countertop space, or cooktop make meal prep a breeze with everything in close proximity to each other.
  • Informal dining or workspace – Kitchen islands with a bar top and stools make the perfect place for eating a quick meal. Or, they can be a useful space for doing homework, paying bills, or reading the newspaper while meal prep is happening or you’re waiting for the oven to finish. With the new shelter in place and work from home popularity, this may become your home office as well.
  • Unique storage options – A kitchen island is typically two-faced … one side faces the wall and cabinets (the private side) and the other faces outward and is visible to others in the room (the public side). Open shelving, closed cabinets, and drawers are all storage options that can be utilized in the kitchen island, depending on what you want to show (or keep hidden from sight). Appliances can even be built into the island so that you have everything you need for meal prep right at your fingertips. 

remodeled kitchen with classic blue island and quartz countertops.

Kitchen island considerations

Not every kitchen island enhances the room it’s in. If it’s not designed properly, it can actually be a detriment to your overall kitchen design and function. Here are some important things to consider before you decide on the final kitchen island design:

  • Kitchen island size – Your kitchen island should be of sufficient size to meet your needs but not so large or so small that it’s disproportionate to the entire room. The kitchen island above is what we consider a heavy-weight in size, weighing in at 8 feet on each side.  This kitchen remodel could afford a kitchen island this size due to the open floorplan and clearances available.
  • Placement – A well-designed kitchen island will be placed where it’s needed most, not in the middle of a high traffic area or off in a remote area of the kitchen. Special consideration should be made for the space around the entire island to make sure that drawers, cabinets, and appliances are all able to open and close safely and freely.
  • Features – The features you choose should be determined by your anticipated use of the space. For example, if you plan on preparing meals there, a prep sink, outlets for small appliances, or a built-in mini-fridge might be on the top of your list of must-haves. An often underutilized feature is storage drawers, snack drawers, and even refrigerator drawers.  A more popular design is to remove your microwave from above your cooktop and move it to your island where it may be disguised in a drawer.
  • Cooking – If you plan to actually cook on or in the island, this must be carefully planned in advance. You should consider heat resistant countertops and whether or not you will use a downdraft fan or overhead vent hood for getting rid of cooking heat and smells.
  • Lighting – Your overhead kitchen lights or ambient light from windows may not be enough to sufficiently light your kitchen island workspace. Other options include recessed ceiling lights or pendant lights to provide lighting directly to where you want to work. Getting the task lighting right is essential for being able to use your island as intended.

Coto de Caza Luxury Kitchen Remodel

Professional kitchen design and remodeling

Whether you have a straightforward space, or a unique one that presents different challenges, working with a remodeling company can help you get the kitchen island design right from the start. At Sea Pointe, our designers work closely with you to determine your specific needs. Then, they pair that with industry standards and your personal design preferences to make an island that is not only functional and efficient but also stylish and beautiful.

For more kitchen island design inspiration, check out our kitchen remodel portfolio.>>

Are you ready for the perfect kitchen island? Give us a call today at (949) 861-3400 to get started!

Let’s Discuss Your Next Project!

  • This field is for validation purposes and should be left unchanged.
  • We guarantee 100% privacy for all information!

Kitchen Island Design Guide was last modified: December 11th, 2025 by Smart Marketing