SCHEDULE YOUR COMPLIMENTARY CONSULTATION

SCHEDULE YOUR CONSULTATION

"*" indicates required fields

This field is for validation purposes and should be left unchanged.
Optin

"*" indicates required fields

This field is for validation purposes and should be left unchanged.
Optin
10 Brilliant Ideas for Painted Floors

10 Brilliant Ideas for Painted Floors

A white kitchen with stainless steel appliances

Painted floors seem to be one of the popular floor design trends and we totally get why. Aside from being budget-friendly and working on a variety of different materials, painted floors offer so many different style options. With a few strokes of a paintbrush and some durable floor paint, your floors can transform with just a few stencils and days later. Here are 10 brilliant ideas for painted floors!

Related: 9 Kitchen Backsplash Ideas for Your Dream Remodel

A blue and white bedroom

1. Blue and White Plaid

Blue and white plaid painted floors can add a vintage design to your home. A bright-colored palette with mixed shades is a clever way to add dimension and fun to the space without much décor. This is an older and more simple design, but it still makes its way in many homes as a popular floor design trend.

painted stair runner design

2. Simple Stair Runner

Blue and white plaid painted floors can add a vintage design to your home. A bright-colored palette with mixed shades is a clever way to add dimension and fun to the space without much décor. This is an older and more simple design, but it still makes its way in many homes as a popular floor design trend.

Black and white checkerboard floors

3. Black and White Checkerboard

Looking to paint your floors with a fun bold pattern? Black and white checkerboard-painted floors make for a fun bold statement. Put a twist on this retro design and swap out the shades for your little one’s favorite colors to match the rest of the room. A room’s design can really influence mood and floor design is a great place to start.

Chevron stained floors scaled

4. Chevron-Stained Floors

Flooring with a Chevron pattern design adds a sense of elegance to a room. The geometry pattern adds a nice visual appeal that also gives a feeling of luxury with just shapes and lines. A creative Chevron-stained flooring on natural wood with altering different shades also can give the illusion of a larger room.

High gloss painted floors

5. High Gloss High Contrast

High gloss on laminate flooring is friendlier on the budget than wood and is a popular choice among homeowners looking to remodel their homes. It is also lower maintenance when it comes to keeping up. However, if you are looking for higher-end wood flooring, it is still a great idea to use high gloss as it is a great durable option. The shiny finish looks nice and sleek and is paired well with a modern contrasting design.

Related: Top 5 Interior Design Remodeling Trends in 2021


Dark wood painted porch floors

6. Dark Wood Painted Porch Floors

To give the illusion of a more sophisticated design, go with a dark brown natural wood color for your porch floors outside. The long panels will give your porch a seamless and larger feel. This will give the outside of your home an elevated design while contrasting well with white or lighter exteriors.

Do you need some help with some upcoming home renovations but aren’t sure where to turn? Check out Sea Pointe Design & Remodel or reach out at clientservices@SeaPointe.com to learn more today.

Graphic painted floor design

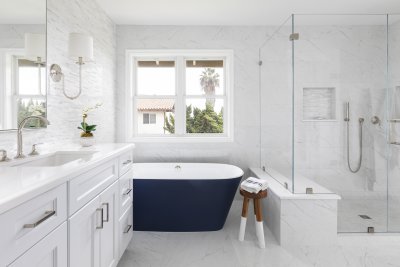
7. Graphic Painted Floors

Graphic-painted floors, like the one in this bathroom, are a practical design that creates pattern and personality into your home décor when on a budget. There are a variety of options to choose from that range from a bold detailed design to a modern geometric style. The size and colors of the graphic painted floors determine a lot as well. Bigger shapes allow for a more creative and fun feel while smaller details tend to create a more traditional aesthetic.

Light and airy white wood floors

8. Light & Airy

Light and airy painted floors offer the home a larger feel. Painting wood plank floors a white color with a clear coat of finisher offers a rustic or vintage design. This is great if you are going for a more natural and spacious atmosphere. The way natural light bounces off of bright colors really brightens up the room and gives off a positive ambiance.

Old stained floors

9. Old Stained Floors

Nothing gives an old house more character than the hardwood floors. Old wood floors are a beautiful vintage feature to a home and with great coating and upkeep can last a long time. Old, stained floors are gorgeous and are popular with farmhouse design trends. It adds a charming antique touch to a home.

Colorful painted stairs

10. Easy 1-2-3 Painted Stairs

Painting numbers on each stair or painting each stair a different shade of color adds a playful design to the space. An easy way to achieve this design is by using a numbered stencil on each stair and painting it in ascending order on the risers. If you are feeling extra creative, go for a rainbow stairway design!

Related: 6 Common Remodeling Mistakes to Avoid


Tips for painting floors

A few points to remember when painting floors

Consider the supplies that you use to paint your floors. Do not use regular paint. You are better off using paint that is durable and made for floors by paint manufacturers. There are floor paint products out there that will keep your paint long-lasting and strong and you want to use at least a semi-gloss finish. Remember, you will most likely want to also vacate the space for several days as the coats dry to save yourself from the strong fumes.

If you are painting more than your floors, always save the floors for last. The last thing you want is to paint from the walls or ceiling to drip down onto your freshly painted floors. This will save you extra work from repainting or cleaning up an accidental mess. You also do not want to paint yourself into a corner, so have an escape route in mind like starting from the opposite side of the door and backing your way out.

Painted floors require slightly more maintenance compared to other types of flooring such as porcelain, tile, or concrete. This is because the coats will eventually run down, or scratches may appear. In order to keep your painted floors nice and fresh-looking, our design experts suggest repainting every couple of years. Therefore, it may be easier to go with a solid color versus a more detailed pattern. But if you do choose to go with a pattern-painted floor, we recommend sealing the paint with coats of polyurethane for that extra durable touch.

Cleaning painted floors

How to clean your painted floor

Taking good care of your painted floors will be well worth your time in the long term. By cleaning your painted flooring now, you will save time and money on a large cleaning or upgrade later. Dusting crumbs, dirt, or sand will help prevent your floors from wearing down and scratching. Following up with vacuuming regularly or using a microfiber mop is best in a continuous motion rather than going back and forth to get the best results!

Avoid using water if you have hardwood floors. Avoid using this moisture-based technique as the moisture and heat can cause damage to the floorboards. Avoid using wax or water-based floor cleaners or polish. Some of these products leave a harmful residue with toxins that will also strip your floor. Polyurethane is good for coating the painted floors but refrain from using oil-based products since it can give your newly painted floor a tint of yellow or orange. The options are endless when it comes to painting your floors. Painted floors are budget-friendly, require good upkeeping, and there are so many different styles to choose from from bold and moody, to bright and fun.

When you are ready to add some flair and transform your home, give us a call at (949) 861-3400 and we will schedule a complimentary design consultation with you. Sea Pointe Design & Remodel focuses on transforming spaces with kitchen, bathroom, room addition, or whole home remodels

Check out > 25 Bathroom Remodels and Why We LOVE Them

Are you thinking about remodeling your bathroom or kitchen but aren’t sure where to start? Check out Sea Pointe Design & Remodel or reach out to them at clientservices@SeaPointe.com to learn about what their top-quality services can do for you.

Let’s Discuss Your Next Project!

  • This field is for validation purposes and should be left unchanged.
  • We guarantee 100% privacy for all information!

10 Brilliant Ideas for Painted Floors was last modified: December 18th, 2025 by Smart Marketing
Master Suite Remodel Uses New Layout for Larger Space and Function

Master Suite Remodel Uses New Layout for Larger Space and Function

This Dana Point master suite remodel is in need for a loving upgrade to include a larger space that provides more function with beautiful design. These homeowners wanted their master suite to feel larger, have more closet space, additional storage cabinets, a bigger shower area, and a private toilet room. This Dana Point home is a forever home for these clients, giving them great reason to create their dream master suite.

Master Suite Remodel Case Study Details

Sea Pointe Design & Remodel Designer, Carolyn has experience remodeling dozens of homes in Dana Point and is an expert at space planning; this is often an overlooked skill designer have. They can see your space without the existing walls, enabling Carolyn to create a new layout to accommodate exactly what the homeowner needs in their new space. By working on many homes in the city of Dana Point, Carolyn along with Sea Pointe Design & Remodel’s production team, know what they can and cannot do when it comes to permitting and structural building in Dana Point. This wisdom helps in a remodel like this where we will see a couple of existing structural features that influence the new layout changes.

Starting with the as-built blueprints

We must start with original plans to ensure we have our true north with measurement specifications. Below are the as-built blueprints for the 550-square-foot master suite. This master suite remodel is on the second floor of this Dana Point home with a beautiful glimpse of the ocean. As you can see, the master bedroom is on the right side and as you walk into the suite, there is an existing sitting area directly in front. To the left of the entryway is a carpet hallway with a long, thin sliding closet door. As you follow the L-shape path, the dual vanities are on the left with a separate washroom on the right that includes a shower and toilet.

As-builts-in-master-suite-remodel

The designer learns what changes the client wishes to make for their new space

The designer works with the homeowners to hear them out on what exactly their wish list consists of and how they want to use their new space. The designer also shares with them functional options that the client may not be aware of, afterall design is not the client’s occupation, but it is ours! Functional needs determine a lot when designing a new layout. For example, these homeowners want to change their isolated washroom that currently has a shower and toilet, into a private room where just the toilet will live and move the shower into a separate space near the bathtub. This original layout does not allow for any privacy while one is taking a shower and the other must use the bathroom simultaneously.

Another item on their wish list is to swap out their long and shallow hallway closet for a large walk-in closet along with building additional storage space. After discussing this with the clients, Carolyn compiles a list of everything they are looking for in their dream space so she can dive deep into suggesting what design and structural options they have with their current building design.

Working with a design and build firm

This is the great part about working with a design and build firm, because everyone is on the same page about turning your design plans into a reality and going through what you can and cannot do during the process, rather than finding out your plans a separate architect drew up will not actually work with a separate general contractor that you want to hire because it may seem more budget-friendly. In fact, homeowners end up saving money when hiring a design and build company because there are little to zero change orders because everything is done right the first time! The general construction bid a GC provides you typically ends up costing you 30% more according to the national average cost of general contractors change orders.

When going through their as-built plans, Carolyn finds an existing post in the dividing wall of the master bedroom and bathroom. This means that they will have to work around this post, since it is integral for the structure of this home and needs to stay put. With this challenge in mind, the clients are thrilled to see what Carolyn has in mind for their new master suite design.

Below, you can see this new floor plan with wall removals and space configuration to fit their new functioning needs.

blueprints-for-new-master-bathroom-layout-in-renovation

Here, we can see the entire master suite floor plan. The hallway moves to the opposite end of the room when you first enter. We also see the existing hallway with drywall is now a massive walk-in closet, which has access through the new hallway. The toilet now has its own private room and was turned 90 degrees to make space for the hallway. In this situation, the toilet needs to be kept close to the existing bay, which is why Carolyn had to get creative with a new layout that still allows for change, while keeping the toilet in the same vicinity. This new layout also allows for a larger walk-in shower, right next to the updated free-standing Victoria + Albert tub for a spacious modern design with a gorgeous pop of color.

Black and white elevations show visual with detail

The clients are happy with the new design layout and decide to proceed, leading to curating these black and white elevations to show where the custom cabinets and windows will go. New cabinets will be installed in the dual vanity as well as brand new built-in storage cabinets nestled in the wall between the vanity and the large walk-in closet.

Black-and-white-elevations-in-master-bathroom-remodel

These black and white elevations show the homeowners a good visualization of where the cabinets will go, so they can be sure they like what they see before proceeding in the design process. Cabinet selection is an important part in this process as the style and finishing can determine the overall look of your design. These homeowners want an upgrade with elegant transitional design. The cabinet selection consists of Renner-style cabinets in white with silver pulls.

These clients also want to remove the existing window in their master bedroom and replace it with drywall for a more functional bedroom that allows them to utilize more space while maintaining privacy. Here, you can see the elevations that demonstrate this window removal.

Structural-plans-in-two-story-home-remodel

Window-removal-in-master-suite-remodel

3D Color renderings show the materials selected

After the clients approve the black and white design elevations, the most exciting part begins! Here is where the clients see all the materials selected and what the overall design should look like in 3D color renderings. As you see, this gorgeous master suite remodel uses a beautiful bright white marble stone backsplash along the vanity wall, giving this bathroom an elegant touch!

Rendering: Double Vanity with Marble Stone Backsplash and Additional Built-In Cabinet Storage

3d-color-rendering-of-vanity

color-rendering-of-cabinets-in-bathroom-remodel

Before: Dual Vanity Prior to Remodel

Dual-vanity-before-picture-prior-to-remodel

This stunning master bathroom renovation allows for more space by removing the wall from the existing toilet room and placing the walk-in shower adjacent to the bathtub, also making this shower larger. The freestanding tub also allows for more open space by converting from a large built-in tub to a beautiful Victoria Albert freestanding tub.

Rendering: Freestanding Tub with Large Walk-in Shower

Rendering-of-freestanding-tub-with-walk-in-shower

Shower-bench-rendering-in-bathroom-remodel

Freestanding-tub-in-3d-color-rendering

Before: Built-in Tub and Shower prior to Remodel

Built-in-tub-before-remodel

small-shower-before-bathroom-remodel

This hallway was placed on the opposite side of the room, with a partial wall removal that was originally a sitting area. Carolyn utilized this space for the hallway so she could turn the existing one into a massive walk-in closet. Dare to dream of dressing in this remodeled master suite walk-in closet.

Rendering: Reconfigured Hallway

color-rendering-of-hallway-reconfiguration

Before: Existing Hallway with Small Closet

before-image-of-hallway-prior-to-remodel

After the 3D renderings have approval by the clients, materials are ordered. Once materials are in the warehouse, the job is ready for an official start date, so the process can go seamlessly. You will never find yourself without a usable space while waiting for construction to start with Sea Pointe Design & Remodel. Your project manager will always have their pulse on your project so that materials arrive before needed and we do not have down time on your time.

These clients want a functional design, that still looks beautiful and elegant, which is why Carolyn guides them through the process of picking out materials that will do the trick in this bathroom makeover. The accent wall behind the dual vanity is made of marble mosaic stone that flows down to the stunning porcelain polished floors. Contrasting beautifully with a bold statement is this Victoria Albert freestanding tub in Sapphire Blue.

Dramatic after photos show amazing transformation of this master suite remodel

After building takes place, it is time for our ultimate favorite part- the “after” photos! Take a look and soak in this stunning bathroom design by Sea Pointe Design & Remodels’ professional Designer, Carolyn.

Dana-Point-Master-Bath-Remodel

Master-Bath-Storage-Cabinets

Bold-blue-victoria-albert-freestanding-tub-bathroom-remodel

Bold-color-tub-in-white-bathroom-remodel

% Dana-Point-Master-Shower

Master-Suite-Walk-in-Closet

There are much more stunning pictures of this master suite remodel. View the complete project reveal!

Let's Discuss Your Next Project!

"*" indicates required fields

This field is for validation purposes and should be left unchanged.
Name*
Project Type
Text Checkbox*

We guarantee 100% privacy for all information!

Master Suite Remodel Uses New Layout for Larger Space and Function was last modified: December 18th, 2025 by Smart Marketing
Remodeling Tips for your California Beach Bathroom

Remodeling Tips for your California Beach Bathroom

Who does not want to wake up to the light, airy waves and refreshing smell of the sea air and ambiance of the waves lightly crashing against the shore?  Let’s plan your beach bathroom remodel.

Oceanic Interior Design

The coastal theme for your new bathroom is one of the most popular designs when re-imagining your sacred oasis.  The beachy, baby blues, sandy tans, seashells and nautical theme has been around for decades.  Whether you go with traditional coral and conch shells or spice it up with a sailor hat or two, the appeal of baby blues, seashells and bright coral colors will have your new bathroom looking as pristine as the Caribbean ocean!  

For one it is timeless and very appealing, so your resale value will go up as the new potential owners will love the remodel you have already invested in.  

Here are some tips on a successful bathroom remodel with a sunshine and seashell escape.  Say that five times fast.  It is also a good idea to plan a remodel this year, since a trip to your newly remodeled bathroom might be your only vacation this year.

Related: How Much Does a Bathroom Remodel Cost? 

Remodeling Tips for Your California Beach Bathroom 

Beach themed bath remodelWhen considering options for your soon to be remodeled dream beachy theme bathroom, its best to start from the ground up.  I do not recommend sand, even though it is a perfect fit to your beach theme, it might be a bit of a headache once it spreads to all over your home. 

It is sand afterall, it’s known for getting everywhere.  Once you have vacuumed your house ten thousand times you might be re-thinking your ocean escape.  However starting from the ground up is sound advice in selecting your sand toned floor, just to be safe.

New Laminate Vinyl Plank (LVP) Flooring

You are probably thinking to yourself; what is an affordable, durable, stylish option for your floors?  The answer is a new product that has hit the market, great on uneven floors and highly affordable, vinyl plank flooring that is practically indistinguishable from hard wood flooring.  New plank vinyl flooring looks so much like real wood, you will not want real wood with all the auxiliary benefits.  I can also guarantee it will be a much better option for you then sand.  LVP looks stunning and has practically zero maintenance. You can spill, mop, and scoot on this material with no worries.

New Faucets 

The next investment should be new water faucets, since most are outdated, gold plated and usually spray everywhere.  Although like ocean waves, not really what you want first thing in the morning. Whether you prefer the waterfall effect or new chrome faucets, they will add value, not to mention decadent taste to your new beach bathroom.  Check out the popular faucets that come directly out of your wall as opposed to being fastened to your sink. There are many fabulous faucet options to choose from these days, just pick the faucet that makes you feel the most zen in your new beachy oasis.

Related: 9 Master Bathroom Ideas for Your Next Remodel 

New Shower Enclosure

No shower door

Next on your list should be a new shower enclosure or should I say no shower enclosure at all.  No one likes the shower curtain look or the sliding glass doors that have last year’s water stains permanently stained foggy glass.  

The best enclosure is no enclosure, no sliding doors, just a space where the water can effectively drain.  An oasis where your rain showerhead falls onto your face and for a moment, you are in Fiji enjoying a hot summer day when the rain comes and it’s the most refreshing feeling you have ever felt.  

You will love waking up in the morning and walking into your beachy themed bathroom, turning on your shower and feel like you are stepping into a hidden waterfall lagoon.  As the water falls from your rain faucet, you will imagine you are in a rainforest and forget all your troubles as the warm, clear water touches your face and awakes your senses.

Hanging Rope Shelf 

Another way to add ambiance to your beachy bathroom is to get shelves with a hanging rope.  It’s the perfect touch to add to your nautical look. You can even add some of the same rope to above your mirror, so it feels like you are in a treehouse and have the thick sailor ropes all around your bathroom.  

Another option is to use driftwood for shelving, you can pretend it just washed up on shore and you were able to create some lovely shelves out of them.  

Adding some coral or some lovely seashells to display on your driftwood shelves is the perfect touch to your beachy bathroom makeover.  One last touch would be to add a lovely beach scented candle to really accentuate your new remodeled bathroom.

Do you have questions about what the bathroom remodeling process looks like? If so, check out our Frequently Asked Questions

Watercolor Art 

When thinking of art to hang in your new remodeled bathroom, look no further than watercolor art.  The soft colors and lines will make you feel relaxed and calm every time you set foot in your little oasis. 

Whether it’s of the ocean itself or a lonely sailboat facing the coming storm, every time you set foot into your newly designed bathroom the watercolor art is sure to take your breath away, or maybe just remind you to breathe, it’s all going to be ok.

Why Opt for a Beach Theme Bathroom?

Why opt for a beach theme bathroom?   If you are not convinced now, I have a few more tidbits of information to share

Well for starters, blue has a calming effect.  In today’s day and age, who does not want that?  Most of us are in dire need of it.  Once you have completed all the above steps, you might find your beach bathroom becoming your most favorite room in the house, and you might catch yourself spending more and more time in there.  

Enjoying all the calming colors, the sea scented candle smell and the ambiance of a beautiful summer beach day.  It is one of the more popular themes you can have so you know it will only add value to your home when you do decide to resell one day. 

Related: 5 Ways to Stick to Your Remodeling Goals 

How Can We Help You

The best place to start when wanting to remodel your bathroom into a beachy dream montage is to hire a professional.  

Sea Pointe construction has over 25 years of remodeling experience.  They are the professionals when you want to upgrade, redesign, or remodel any part of your home.  

Give them a call today and make an appointment with one of their design architects to go over what you are envisioning, what kind of budget you are working with and they will take it from there!

Are you looking to begin your bathroom remodeling project in Irvine, California? If so, contact us today! 

To see more of our bathroom design inspiration, be sure to check out our bathroom remodeling portfolio here>>


Let's Discuss Your Next Project!

"*" indicates required fields

This field is for validation purposes and should be left unchanged.
Name*
Project Type
Text Checkbox*

We guarantee 100% privacy for all information!

Remodeling Tips for your California Beach Bathroom was last modified: December 18th, 2025 by Smart Marketing
San Clemente Kitchen Remodel Case Study

San Clemente Kitchen Remodel Case Study

Remodeling can be exciting, fun, exhilarating, and terrifying all at the same time.  After all, this is your home where you feel safe, have doors and locks and only invite friends and family in. Now you’re inviting strangers to come in and take a sledge hammer to what may be your largest single investment.  We wanted to document a recent San Clemente kitchen remodel from start to finish to share with you the process; from the process fundamentals to the designer’s plan, and the builders execution.  Join us on this journey where we diary the remodel of a San Clemente kitchen remodel.  We will share weekly updates with you as we swiftly design and build this client’s new kitchen.  We’ve employed time lapse video so you can watch each week without having to sit through hours of video.

Starting the Kitchen Remodel Process with a Design Session

The first step in this San Clemente kitchen remodel was the client calling in to ask for her complimentary design consultation. Our Director of First Impressions does a short interview with the prospective client to determine a best fit kitchen designer. Best fit means location of the job as you’d like an expert in construction from the area as well as personality fit.  Our designers design to your style by collaborating closely with you through the design phase of the remodel.  In this case, Sea Pointe’s designer, Janna went out and met the client to learn about their kitchen remodel needs.  This first design consultation includes an informal interview where Janna and the client get to know each other. This includes asking for designs the client likes versus design styles the client does not like. We ask clients to take a look at our kitchen remodeling portfolio and share 3 designs they like and 2 designs they do not like; Janna then asks specifics as to what aspects of each design does the client like and not like.

Janna then takes measurements of all of the spaces the client is interested in remodeling and continues with her interview process to learn how the family uses their kitchen space. For example she asks if they like entertaining, where do you spend Thanksgiving, do you host dinner parties, game nights, as well as how often you cook for your family. Janna found out this family had children growing into their tweens that are now using the kitchen on their own as well as they help out in the kitchen. You’ll find this detail had a big impact in the design recommendations Janna made.  With sheltering in place orders, the kids are now spending more time at home and doing their school work at the dining room table. This is another detail that had a big impact on the remodeling design options. Through the interview process, Janna was able to determine that many options were not necessary for this family, such as a pot filler as they do not cook pasta or potatoes or rice much.  And many details you may not notice immediately were determined to increase the beauty of the space while not limiting the function.  The client showed Janna pictures that were light and bright and expressed interest in some on-trend design elements.

Kitchen before kitchen for remodel

As you can see the starting point from the “before” picture that it’s still a very nice kitchen, just using some cabinetry, countertops and flooring that are a little dated. Typically clients ring us up when they need a new configuration to make better use out of the space or to freshen up the design with a professional designer’s eye. In this case, the client wanted both of these services. The small kitchen island was not providing as much value as it was causing traffic jams in the kitchen with a family of four.  Janna  recommended opening this space up for better flow and add a peninsula to have more counterspace as well as provide extra seating. This enabled the kids to also have additional space to do their homework.  There’s a butlers’ pantry between the dining room and kitchen that the client wanted to match the new décor and add a beverage center.

Design Agreement Meeting at Our Design Showroom

Janna scheduled the next design agreement meeting to have the client meet her in our Design Showroom where she can see all the materials we have to choose from as well as plenty of design inspiration.  She leaves the client’s home after an hour and 20 minutes with everything she needs to present a design proposal to the client a week later. Janna gathers pricing on kitchens of similar size and project scope; meaning she looks for jobs we have recently completed that also have an island removal and peninsula addition with similar cabinet layout / number of custom cabinets designed and built as well as countertop surfaces.  Janna compiles the similar jobs with before and after photos, black and white cabinet elevations, and 3D color renderings to show you what is included in the design phase of your remodel. She now puts a price range together based on the previous jobs she is using to build your design proposal. The client thought this was a good fit between her family and Janna as well as the Sea Pointe Design & Remodel design build construction delivery model. At this point in the kitchen remodel process, the client provided a design fee to Sea Pointe so they could start the design process.

Floorplans for Your Kitchen Remodel

The first thing your designer does after the design agreement is to ask you for your as-built plans. This is the current floorplan of your existing kitchen. If you do not have your as-builts, we will draw them for you. These are important communication tools that Sea Pointe Design & Remodel designers, project managers, and tradesmen use to ensure everyone has precise measurements and one source of agreement. The as-builts are also used to start drawing your new floorplan. In this case, the new floorplan has the removal of the island and the addition of a peninsula.  Below you can see the as-built and new floorplan side by side.

As-built plans with proposed plans

Designing Your Kitchen with Your Kitchen Designer

The next step is for Janna to gather color palettes and design ideas to the client so she may pull some materials to review with the client. During this time, Janna is reminding the client of the design budget range and providing materials in that range. Often times during the design phase, we encounter what we call, scope creep. It’s very exciting and fun to design your new kitchen remodel, but it can get out of control with fun and you find your final pricing not so fun. It’s this reason that Janna is protective over your budget to keep you in between the pricing rails discussed.  Should the client decide they want to add onto the project, we will gladly accommodate and provide the pricing separate from what was agreed upon in the initial scope. This client kept to their original plan with the exception of using a beautiful solid slab backsplash which necessitated a more complicated electrical plan to hide the electrical in the cabinetry enabling a continuous slab to be used; this makes the space feel larger and luxurious.

Once the materials are selected, Janna works with our cabinet designer to lay out all of the materials into a cabinet plan. These contain very specific details on the cabinet types and measurements. There’s more detail than you may consider in ordering cabinets and these are the most expensive part of your kitchen remodel and why it’s so important these are accurate. This client selected two-toned custom Omega cabinetry with white Renner- Beach House (door style) cabinets on top and chestnut Renner on bottom. This client had stacked cabinets on the upper enabling Janna to infuse more light into this kitchen with 11 glass door inserts with backlighting to illuminate the white cabinet interior.  The client decided to go with upgraded countertops and selected Taj Mahal Quartzite.  The client also selected a fantastic laminated vinyl plank flooring that is practically indistinguishable from natural wood and much more easy to maintain; Gemcore Manhattan series in Topaz.

San Clemente Kitchen Elevations

cabinet elevations

Once the client approved the black and white elevations, Janna will commission the 3D color renderings to be designed by one of our talented cabinet designers.  These elevations are very close to photo like realistic and a great place to make changes on paper and not in the field. The 3D color renderings are another communication tool we use to show the client what their remodeled design looks like. These renderings are true-to life with windows and existing structures that will remain. Often times at this stage in the design process, clients are able to see their material selection come to life and identify material changes. It’s much more affordable to change at this stage rather than after materials have been purchased.

3D color renderings for kitchen design

3D Kitchen color renderings

The client loved the design Janna showed her in the above 3D color renderings. The only item she wanted to change out was the pendent lighting and that was an easy change.  We swapped out the pendant lighting to the new lighting selected and the client gave us the green light that she was happy with the design. We love making clainets happy!

Your Construction Agreement

The next step when working with a design build firm is for your designer, Janna in this case to price out every item that was selected as well as all of the construction materials that go into the job. This includes all of the demo, dry-wall, flooring, lighting, sink, faucets, cabinetry, plumbing, electrical…down to every single nail that will be needed for your job. This takes any unnecessary surprises out of the remodeling process. Janna prices the whole project out in a construction agreement.  This is the price you will pay for your all-inclusive project. Every detail is laid out for you so you know exactly what you are paying for before signing an agreement.  Upon reviewing the agreement, the client signed the construction agreement and gave us a deposit.

Upon getting the deposit, Janna starts coordinating with your project manager to procure your materials and ensure all the materials are available on the job site the day they are needed. First comes your cabinet order which has a 6-8 week lead time to build your custom cabinets and have them delivered. While the purchase process is occurring, your PM is also submitting your plans to the city for permitting. Due to the current COVID precautions, permitting may also take longer than normal. Your PM is also coordinating demo dates with one of our skilled demo teams and coordinating the tradesmen and when they will be needed on the job.

Kitchen Remodel Kickoff: Job Walk

The next step in the process was to review the project plan with the client, the project manager and Janna. This is where we do a job walk with you to review the project and all the very important details necessary to work in your home every day. Items like children’s names and must-know allergy issues, dogs names, escape artist pets, nosy neighbors and anything else we will need to work along side your family in your home. You will get important dates and project details to prepare for during this meeting.

Demolition Day

Next step is demo day – removing all of the old and leaving just the bare bones. This is always a happy day for clients and this family was no exception – getting rid of something that has been bothering you for years has an extremely freeing feeling that we often hear from clients at this stage of the remodeling process.  Below you can see week one demolition. Notice how clean our crew leave the jobsite every single day.

Kitchen Remodel Construction Begins

Once the demolition is done its time to do the necessary rough ins to support the cabinetry. We ensure your insulation is not damaged and in tact. We need to do any electrical install for wiring needed after cabinet installation  Due to no visible outlets, you’ll notice quite a bit of electrical coming from the ceiling for the in cabinet lighting. The next step is to install the drywall by nailing the sheetrock panel to the framing and then drywall joint tape is applied to the seams between each drywall panel. Once the seams are all taped up, the crew applies the joint compound on top of the sheetrock. This is left to dry for approximately 24 hours. Once it’s dry the crew starts the drywall sanding process. This is not a fun time with dust in the air, but we do have excellent plastic walls with zippers to prevent as much dust as possible from escaping into your living area.

Drywall installation in Kitchen remodel

After the drywall sanding is done, you’re ready for your coat of primer and paint. Next step is cabinet installation – let’s start making this kitchen take shape with the beautiful custom cabinets that were delivered just in time for installation because we ordered them before we started demolition or even pulled the permits. Ahhh the joy of perfect planning is why design build is often a choice of construction delivery for very busy professionals.

The next step after the cabinet installation is the sink template. The installers will use a jigsaw to cut out the sink template in preparation for the countertop installation.  Once that is set, the Taj Mahal quartzite countertops are ready to be installed. While this material is extremely heavy and awkward to handle, the installation is simpler than most folks think. The installers use adhesive to bound the countertops to the cabinet boxes.  Sealant is used around the sink joint and around the plumbing fixtures.

countertop installation

Kitchen Remodel Photo Shoot Reveal

Finally the cabinet hardware is installed and lastly the flooring is installed. All this happened over an 8-week period. Below you can see the finished remodel in our San Clemente Kitchen Remodel photo shot reveal.

Kitchen-remodel-San-Clemente

There are so many beautiful details to take in from the stunning photo shoot reveal. Don’t forget this project came with a butlers’ pantry remodel as well. To see the complete San Clemente kitchen design and remodel reveal, click here>>

Let's Discuss Your Next Project!

"*" indicates required fields

This field is for validation purposes and should be left unchanged.
Name*
Project Type
Text Checkbox*

We guarantee 100% privacy for all information!

San Clemente Kitchen Remodel Case Study was last modified: December 18th, 2025 by Smart Marketing
Renovating a Farmhouse: The Ultimate Guide

Renovating a Farmhouse: The Ultimate Guide

You should be cozy in your new farmhouse but there are things to consider during the renovation process. We will be covering some of the most important aspects of renovating an old farmhouse.

Renovating-a-farmhouse

Farmhouses are one of the most romantic and charming homes you can live in. You are looking for that perfect cozy old home to live in and just make a few fixer-upper renovations to, but before you make that big purchase, there are many things you need to know ahead of time to avoid significant stress and money loss. And all the enchanting features in your future farmhouse might just be the cause. From old wooden floors to the delightful windows, and the Soapstone countertops, here is what you need to know before renovating your farmhouse.

Farmhouse-design-in-home-renovation

Why a farmhouse?

Around tall trees, a big yard, and a quiet neighborhood, a farmhouse seems like the perfect escape for one who is caught up in that bustling everyday lifestyle. After packing up you’re belongings and searching on Zillow, Houzz, and Pinterest to see what you can find, you spot a home with aesthetically pleasing beat-up wooden floors, beautiful old windows, stone countertops, and your favorite part, the clawfoot tub. These are the design features of a farmhouse that you love and look forward to renovating. After finding the right home, you are one step closer and are ready to dive in and get to work.

Things no one tells you

Or so, at least that is what you think. The only issue is that there are things that no one tells you when purchasing an old farmhouse to renovate. It is up to you to research, so you know what you are getting yourself into and prepare mentally, physically, and emotionally since this is a space you will be in every day.

You can spend a fortune on upgrading the basics

With older homes like a farmhouse, the chances are that you will make a lot of upgrades, and we are not just talking about design. Just because it looks charming on the outside does not mean it looks the same on the inside. Behind the walls will need more upgrading than you thought. It is also highly likely that plumbing fixtures will need replacing as well. Old electrical systems and water pipes will need replacing. These are basic upgrading features that you may end up spending a fortune on. It is always best to prepare yourself to go in with an open mind that you will spend more than you think.

Wood-floors-in-farmhouse-renovation

You may have to replace the wood floors

Old wood floors are great for design but will need a lot of TLC because, well…they are aging. Wood floors can also go through multiple refinishing, but the limit is around 10. If the flooring is getting to that point or is in poor shape, it is safer to replace the old wood floors and start from scratch fully. Some of the obvious ways you can tell if the wood needs replacing are warping, loose spots, or finding termite droppings in your home because that could be damage waiting to happen.

Farmhouse-window-design-in-home-renovation

Charming old windows may be drafty

Similar to the wood floors, the windows may look gorgeous with the beat-up vintage design, but if they are original farmhouse windows, that probably means that they are single and not double-paned. This means you may be freezing come wintertime. Some may believe that it is better to keep original windows because of their sustainability, so they would rather endure the draft. But we suggest having a professional come out and look at it to determine what is best. The last thing you want to do is be stuck freezing in your own home and have something go wrong if you attempt replacing the window yourself.

Fireplace-in-farmhouse-home-remodel

There could be hidden dangers

When renovating an older home, it is crucial to understand that there may be lead paint on the walls, or the home may need asbestos testing done if it was built before 1978. The older the house, the bigger the chance for flaking, especially on ceilings, old tiles, pipes, fireplaces, and window wells. You usually will not think about this when it comes to the features in your new home, but it is one of the most necessary items you need to take care of and by a professional. Be on the lookout for this hidden danger.

Soapstone-countertops-in-home-remodel

Soapstone counters aren’t zero maintenance

Soapstone fits perfectly in the farmhouse design. It looks great, and it has attractive features like being heat-resistant, stain-proof, and does not dent easily. The only catch is that scratches easily damage it because it is a softer stone than granite or marble. This is one of the higher maintenance countertop materials and will need regular cleaning with mineral-oil to keep its sleek and bold look. Soapstone can work well as sinks and a fireplace surrounding because of the heat resistance factor. Because soapstone is very dense, cutting and installing it may be difficult and nearly impossible by yourself, which is why we also recommend working with a design expert to help you. The last thing you want to do is damage other areas of your house or yourself.

Castaway-tub-in-home-renovation

That clawfoot tub may have to go

That vintage cast iron clawfoot tub in the bathroom looks gorgeous, but if the flooring is old, chances are this is a disaster waiting to happen. A heavy tub filled with water and yourself, no offense, might be too much weight for the old wood floors to handle. The original flooring may also be at a slope because of its natural age, and placing a cast iron clawfoot tub on an uneven floor may not be the best idea. Speaking with a professional designer will give you insight into the best options for your “new” home.

If you are set on keeping your clawfoot tub, it is important to get a construction service that also deals with design. This will ensure that your bathroom will match the beauty of your vintage clawfoot tube while also being functional for the needs of such a heavy tub. You can fill out the form below to schedule a design consultation for your bathroom remodeling.

Get an inspection

To be safe, we suggest getting an inspection from an expert. They will tell you everything you need to know about your home that you may not be able to see from the outside looking in. You do not want to start tearing down walls just to find more issues that could increase your costs by a ton. Then the next thing you know, you are living in a half-renovated home because you do not have the time or money to finish the job. The most important item during a home inspection is the structural integrity of the house.

It will take more time than you think

It will take more time than you think to renovate your farmhouse home. These homes are older original homes, which means with all the testing and repairs, you will be spending plenty of time on this home improvement remodel if you are trying to accomplish this on your own. There is a good reason why there are home remodeling experts. They can help you achieve what you want in a faster amount of time.

Wood-floors-natural-elements-in-farmhouse-design

Forget perfection

During this process of renovating your farmhouse, it is best to let go of the idea of perfection upfront. There are many natural elements involved with a farmhouse design, from the countertops to the wood floors to the fireplace. When using natural materials like Soapstone and wood, you will have a design that you will not be able to customize fully.

Grout-and-Soapstone-countertops-in-Farmhouse-Renovation

You’ll learn a new language

You will find that you will suddenly have discovered a new language when you are done with this process of remodeling your farmhouse. When working with a remodeling designer, you will pick up new words in your vocabulary such as grout, threshold, Soapstone, caulk, and more.

Home improvement stores will be your new hangout

If choosing to go the route of doing it yourself, you will find that Lowe’s and Home Depot will be your new daily hangout spots. However, by doing this renovation on your own, you will probably have to make multiple trips through trial and error since you will be learning a lot about this new field along the way. And that means the project will take longer, there will be more errors, and you may spend twice the amount instead of going through an expert the first time.

Farmhouse-design-for-home-remodel

Why you should hire a professional to remodel your Farmhouse

You may believe that remodeling your home by yourself is a fun project that will keep you busy and save you a lot of time and money since you are on your schedule. However, that is just not the case. Hiring a professional designer and builder can save you time, money, and about a thousand headaches. At Sea Pointe Design & Remodel, a design and build remodeling firm, we work with you to bring that vision you have to life. Instead of going through the pain of buying an old farmhouse just to have that aesthetic, why not transform your current living space into one with a modern farmhouse design? We will work with you on your farmhouse home remodel, giving you a chance to relax but still enjoy being a part of the process.

To schedule your complimentary design consultation, give us a call at (949) 861-3400 or fill out the form below.

More reads >> Your Ultimate 2021 House Renovation Checklist

Let’s Discuss Your Next Project!

  • This field is for validation purposes and should be left unchanged.
  • We guarantee 100% privacy for all information!

Renovating a Farmhouse: The Ultimate Guide was last modified: December 18th, 2025 by Smart Marketing