SCHEDULE YOUR COMPLIMENTARY CONSULTATION

SCHEDULE YOUR CONSULTATION

"*" indicates required fields

This field is for validation purposes and should be left unchanged.
Optin

"*" indicates required fields

This field is for validation purposes and should be left unchanged.
Optin
Structural Room Addition Case Study

Structural Room Addition Case Study

Newport Coast Structural Room Addition Remodel

Designed and Built by Sea Pointe Design & Remodel

From blueprints to final touches, it takes an entire team of skilled professionals to create a beautiful new space to meet an individual’s needs. And when building an entirely new space, you need to have the ability to literally think outside of the box. Hiring a design team and project manager with the ability to execute that vision is also a key factor in designing your unique new space. In this article, we are going to lay out the inner workings of a design/ build company along with what a customer’s journey from the first appointment to the final site visit would be like for a second-story room addition.


Should I add a room or should I remodel?


Define Your Goals

You have decided you need more room in your house, whether it be due to a new baby, a new work-from-home job or you simply need extra space in your home, but where do you begin? The first step is to break down what you are looking to achieve and to define your goals. Are you looking to increase the square footage and/ or value of your home? Or maybe you are building your forever home and want to turn it into your own personalized private retreat? Would a remodel make more sense than adding more space? What is the purpose of your home addition?

The first few questions you should ask yourself are:

  • Is it going to be worth it?
  • How much will the addition affect the layout of my home?
  • How much space do I have for a home addition?
  • Is a home addition my only option?
  • Should I hire a remodeling company or a contractor?
  • What permits do I need?
  • Will my HOA allow an addition on my house?

The next set of considerations would be:

  • How big should my addition be?
  • Should I build up or out?
  • How much should I plan to spend?
  • How do I want the new addition to flow with my current floor plan?
  • Can my home life handle a disruption due to construction?
  • How soon can I start?
  • Do I have a deadline?


Set A Budget

Every home addition is unique and will vary in cost. Adding a bump out or sunroom could start at $10,000, whereas a second-story room addition could range between $150,000- $500,000. Knowing these ranges can help you to set a budget while keeping in mind average prices in your area. Due to national economic factors and regional labor markets, some cities are more expensive to build in than others. Some national supply chains are still high since the Pandemic and local contractors have increased prices to account for these costs. You should also factor in non-construction related expenses associated with adding square footage to your home such as increased homeowners’ insurance premiums, higher property taxes as well as increased heating and cooling costs. Before you commit to building an addition to your home, figure out what you can afford and how much you might need to finance your project.


Ask Questions

You need to ask questions to find the right fit, but what are the right questions to ask? There are several options to choose from when planning a home addition and we suggest pinpointing a few ideas before seeking guidance from a design & build team.  Whether it be a vision board, a wish list, or some pictures you collected online, this will help you and the designer define which direction you ultimately want to go.

Since each project comes with its own unique list of wants and needs, below are a few questions you should ask when interviewing designers and contractors:

  • What experience do you have with home additions?
  • Are you licensed, bonded, and insured?
  • Do you have any Warranties on your work?
  • How long will the project take?
  • How do you plan on blending the addition in with my existing home?
  • What is your estimate for the project?


Do Your Homework

Not all keys fit into the same lock and the same goes for building an addition to your home. A good rule of thumb is to gather quotes from more than one company (we recommend at least 3) and to compare what you will get from each company. Some companies will require you to obtain your own materials, some might require longer build times, while some companies will include a full-service experience. Whatever it is that you and your budget are looking for, make sure you find someone you are comfortable with and who makes the most sense for your unique project.

Below is a checklist our designers at Sea Pointe give to each of our customers to help them to compare what they are getting for their money from each company they interview. We believe in shopping for the best construction company for YOUR project.

  • Dedicated Interior Designer
  • In-House Architect
  • Integrated Engineer
  • Building Permits
  • Assistance with HOA
  • Planning & Budgeting
  • 3D Color Renderings
  • Detailed Proposal & Addendums
  • Design Showroom Access
  • Material Procurement


The Design/ Build Process


What is Design- Build?

Design-build, also known as alternative delivery, is a system that delivers a project where the design and construction services are contracted by a single entity. The designers, engineers, architects, and project managers work as a team to listen to the homeowner’s ideas and the homeowner only has to manage one company with a single point of responsibility and accountability. Sea Pointe Design & Remodel offers all services under one roof, which in turn helps projects to run smoother as well as reduces wait times from 3rd parties.

Sea Pointe uses the design-build process to build your project so that you are aware of the complete remodeling costs inclusive of all labor and materials prior to signing an agreement. The design-build system also saves time and money while allowing for more innovation and collaboration resulting in better-built projects. Once you have found your perfect fit with a design-build company such as Sea Pointe Design & Remodel, your remodeling journey is ready to begin! Below are the steps you can expect to see from our full-service design-build company during a multi-room addition on a home in Southern California.


Space Planning

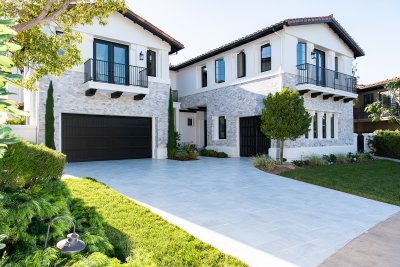
Sea Pointe Design & Remodel believes their client should have a layout that best suits their needs. The homeowners of this Newport Coast home wanted to refresh their entire home inside and out. This included giving the exterior a face-lift as well as creating an additional bedroom, Jack & Jill bathroom, a bonus room, and extending the back patio areas on the second floor.

With a strict HOA in place, our designers had to get creative in their plans to make sure the homeowners got the Farmhouse look they desired while adhering to the distinct Spanish style motif the neighborhood required. In this case study we are going to focus on the front-of-the-house addition which includes a bedroom, bonus room, and a Jack and Jill bathroom.

In the before images below you can see on the right side of the house a single-story structure whereas on the left side of the house is a 2-story structure. The homeowners asked us to utilize this open space to increase their square footage as well as create an entertainment space for their son. Our design team was excited and eager for the challenge and started working on the second-story space plans right away.

newport-coast-addition-sea-pointe

Home-addition-orange-county

second-story-addition-newport-coast

second-story-room-addition


Site Plan

The first step is to gather all details of the site and when it comes to an addition, this is where an engineer and an architect will be a vital requirement for your project. In the first image below, you can see the layout of their plot of land with all structures that already exist on the property.


As Built Renderings

The next images below are the “As Built” renderings of the first and second floors showing the current layout of the home. This gives the designer the measurements to know what they are working with as well as an aerial view of the space to help create the technical specs required. For an addition of this scale, the structural engineer needed to come out to the site to view the space to ensure the project was something the designers could work with. Once they saw that the ability to build up was good to go the engineer started working on the foundation and framing plans.

First Floor:


Second Floor:


Proposed Space Plan

With the help of our in-house architect, a proposed second-floor plan was drawn up to incorporate the new additions to the front and back of the house.


Proposed Second Floor Plan:

second-floor-proposed-plan

In order to connect the new second-floor additions and continue a cohesive flow to the existing house, the designers realized they would need to create a new hallway connecting the new bonus room, bathroom, and bedroom to the front of the house. Below you can see a close-up of the proposed new additional floor plan including measurements.


Close Up of Proposed Second Floor Addition:

Mead-addition-close-up


Roof Plan

When creating a second-floor addition, a new roof will also need to be considered into the plans. This homeowners HOA had a strict rule requiring every house to include a Spanish tiled roof, so the designers already knew to use a barrel-style roof tile in their design. Keeping in step with the existing aesthetics of the structure, the designers liked the idea of mimicking the left-hand side of the house and adding a pitched roof over the right side. Below is a rendering of the proposed new roof plan connecting to the existing structure a cohesive

mead-roof-plan


Preliminary Building Section- Roof Plans:

Preliminary-roof-building-section


Exterior Elevations

Once the newly proposed space plans have been drawn out, the designers work with the homeowners in deciding what the final exterior look will become. They knew they wanted a farmhouse look but they were also required to keep the Spanish tile roof. They also wanted to make the house look brighter but not one solid color. The designers suggested adding some texture to the house such as brick or stone and the homeowners also agreed.

Below are the black and white elevations of the proposed space plans the designers presented to the homeowners to go over the fine details and make any updates needed before going into construction.


Proposed Northeast Elevation:

front-of-house-elevation


Proposed Southeast Elevation:

southeast-elevation-room-addition


Proposed Northwest Elevation:

proposed-northwest-elevation-room-addition


Interior Bathroom Elevations

The interior elevations are just as important as the exterior elevations. It is important to factor in things such as counter height and style. Which door and drawer style; do you even want drawers? Which wall finishes to place on the wall and where to place them?

Elevations are the blueprints for how the new layout for your project is going to be planned out. Besides illustrating the height of the cabinets you will also need to factor in where new electrical and plumbing will need to be installed as well paint color, tile, etc. Window placement is another challenge as you will need to ensure window placement goes along with the interior and exterior design. Below are elevations for the Jack & Jill bathroom and its anticipated look.


Proposed Jack & Jill Floorplan Elevation:

jack-and-jill-floorplan


Proposed Jack & Jill Vanity Elevation:

jack-and-jill-vanity-elevation


Color Selection

Once the elevations are created, the color selection comes next. Knowing the homeowners wanted a Coastal Farmhouse look, our designers started playing around with different color options until they finally landed on a black-and-white color pallet. Since the siding of the house already had a smooth base they wanted to add texture to the house as well. They found some gray chiseled stone caps and opted to add them to the lower half of the house while lightening up the upper half in bright white paint. Adding black accents to the garage doors, window frames, and railings helped to create that pop of glamour the homeowners were looking to achieve while also matching the look of their upscale neighborhood.

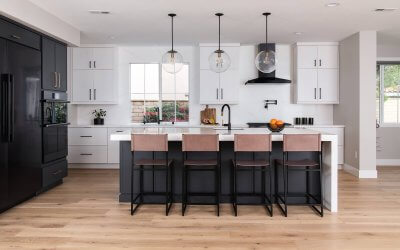
Matching with the exterior, the designers brought the black and white color scheme into the interior, including pops of natural wood and accents in blue and gray. They also wanted to ensure there was a lot of natural lighting inside the new addition. While looking to match the aesthetics of the exterior, the designers strategically placed windows to go alongside the new interior layout. They also opted to add another balcony to the new addition, not only allowing for more natural light as requested by the homeowners but also add another place to sit and relax.

Below are examples of interior and exterior elevations the designers created to help show the homeowners what the materials would look like and where they will be placed.


Exterior Materials:


Interior Materials:

mead-interior-materials


3D Color Renderings

Once all materials are selected and the design is laid out, our designers get together with our in-house architect and create 3D color renderings of the new additions so their clients can envision the completed look prior to making any material purchases. Making decisions in advance helps to create less impact on the client’s daily life in their home as well as cutting out any delays in construction. Making change orders can also seriously impact a project’s budget and timeline. During this project, the homeowners ended up making several change orders during construction as well as adding on additional work. When you compare the completed pictures to the 3D color renderings below, you will notice how the 3D color renderings look slightly different from the final product as the homeowners realized they wanted to create a more dramatic look as well as add some texture after viewing the 3D color renderings.


Exterior 3D Color Renderings:

exterior-rendering-1

exterior-rendering-2

exterior-rendering-3


Interior Jack & Jill Bathroom Renderings:

Floor-Plan-RenderingJack-and-Jill-Vanity-Rendering

niche-rendering   side-view-2-rendering

side-view-1-rendering

**The homeowners opted to have 3D Renderings created for the Jack & Jill bathroom, no renderings were created for the additional bedroom or bonus room.

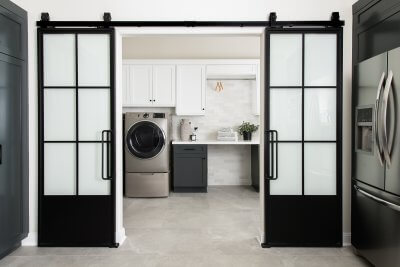
The above renderings provided the client with a complete visual aiding them in making some changes to their material selections, both inside and out. You can see where they added the chiseled stone facade to the exterior and accented the trim and wrought iron balcony railings in caviar black. In the bathroom, you will notice they changed the mirrors from square to round as well as adding 2 barn doors on each side.

Once the renderings were completed and the client approved all material selections, we were ready to begin ordering materials and start the pre-construction process.

Building Your Structural Remodel

At this stage of the process, the designers calculated the total cost for all materials and labor and proceeded to draw up the client’s final construction agreement. This included everything from the demo, drywall, flooring, lighting, plumbing, etc… everything down to the very last nail.  The Sea Pointe team prides itself on having minimal unexpected costs or surprises once you enter into a construction agreement. This made our clients feel confident and happy to start their new addition with Sea Pointe.

Once the construction agreement was signed and a down payment was deposited, the designers then coordinated with the project manager assigned to their job to procure the materials needed and then handed over the job. The project manager then pulled permits and created a timeline so the clients knew when each site visit was scheduled. The PM also coordinated demo dates with our skilled demo team as well as with our preferred tradesmen. The homeowners said this really helped to keep them from getting displaced from their daily lifestyle.


Job Walk

The next step in the process was to review the project plan onsite with the clients, the project manager, and the designers. In this meeting, they gathered all the important details necessary to work in their home such as their kids and pets’ names, some allergy issues that were brought up as well as some info about a nosy neighbor.  (You will still have your designer at pivotal construction points join you on the job site to discuss things such as tile layout and design details that may change once the materials arrive). The PM updated them on project details and gave them access to an online schedule that provided them with live updates on their project including progress pictures.


Demolition Day

This is always one of the happiest days for our clients as they love to put on their safety goggles and see all the hard work they put in taking shape. On demo day, you can anticipate a lot of loud noises and a lot of dust! Heavy-duty plastic liners are used to enclose areas under construction which help to decrease dust and debris throughout the house. This isn’t a task for an amateur and could be downright dangerous, so always make sure to use a professional company to do your demo work. Sea Pointe takes pride in our work and our crew does a wonderful job in cleaning up at the end of each day to keep our clients safe and happy. The homeowners in this remodel said “We were so happy to have Sea Pointe create the new addition to our house. Not only was the field crew friendly but they were clean! Every day when we came home we were pleasantly surprised by how little dust and disruption we had to endure during this huge remodel. We all felt very safe and in great hands with this team, we highly recommend Sea Pointe Design & Remodel!”.


Construction Begins

Every project is unique and has its own special timeline. Making changes throughout a project can extend timelines drastically, so making sure you have everything measured, picked out, and approved beforehand is extremely crucial in this phase. Sea Pointe has several Project Managers with their own dedicated experienced field crew they use for each project they are assigned. Using the same people on each project not only speeds up the construction process but it can also guarantee that the job will get done right. The original timeline for this project was estimated to complete within a year however the homeowner really liked how our team worked and ended up adding several additions to their contract including a remodel of 5 bathrooms, 5 fireplaces, adding a California Room to their backyard, resurfacing their pool, new landscaping and updating their outdoor BBQ area as well as several other projects throughout the house. In the end, this project ended up taking just over a year and a half to complete. There were of course several hurdles that needed to be attended to, but that is why they hired a design and build team like Sea Point Design & Remodel… to take on their huge wish list and to ease the heavy lifting off their shoulders.


The Reveal

And now onto the best part, the reveal!! After all the designing, ordering of materials, making sure every last detail is accounted for, we finally get to see the results of all that hard work pay off! Take a look at the pictures below showcasing the dedication put forth by the homeowners, designers, project managers, field crew and everyone else behind the scenes who helped to create this beautiful “new” home. We hope you enjoy these photos and video as much as we enjoyed creating this beautiful new home for a very happy and very satisfied family.

Exterior Home Addition and Remodeling Photos

Whole-home-remodel-newport-coast-front house new-driveway-in-porcelain-pavers-versailles-pattern


Interior Home Addition and Remodeling Pictures

hallway-addition-new-construction-remodel

New Bonus Room

reclaimed-wood-beams-bonus-room-addition

New Jack & Jill Bathroom

Jack-and-jill-bathroom-addition-second-floor-dual-vanity walk-in-shower-porcelain-tile-pony-wall

Enjoy this video featuring the designers behind this spectacular Whole Home Makeover from Sea Pointe Design & Remodel in Orange County, Ca.

We love our happy clients – and clearly they love us too as 52% of our business comes from repeat and referral clients. If you are looking to remodel any space in your home and are ready to talk to a design consultant, make sure to call the experts, we’re here to help you update or create your family’s idyllic sanctuary. Call us today to schedule your complimentary consultation (949) 749-5763.


Let’s Discuss Your Next Project!

  • This field is for validation purposes and should be left unchanged.
  • We guarantee 100% privacy for all information!

Structural Room Addition Case Study was last modified: December 11th, 2025 by Smart Marketing
Laundry Room Design Must-Haves Combining Looks & Function

Laundry Room Design Must-Haves Combining Looks & Function

barn-door-track-sliding-system-new-laundry-room - laundry room designWhen you think of your laundry room, you might picture one of the hardest working rooms in the house. But, just because it’s made for everyday use, it doesn’t mean your laundry room design has to be drab and uninviting.


In fact, since you’re going to spend significant time in it anyway, why not make your laundry room completely meet your needs but look beautiful, too? Today, we’re going to help you do just that with a few laundry room design ideas from remodeling pros.

7 Tips for the Perfect Laundry Room Design


1. Make sure you have enough space.

Lake Forest laundry room remodel - laundry room design

Exactly how much space you need will depend on several factors:

  • How big is your family? The more people living at home, the bigger the space should be to accommodate everyone’s laundry.
  • What type of washer and dryer do you have? Side-by-side models may allow for bigger laundry loads but will take up more linear space. In contrast, stackable units are more compact but may not be big enough to handle your family’s laundry volume.
  • What else will your laundry room be used for besides washing and drying clothes? If you expect to also do ironing here on a regular basis, store cleaning supplies and tools, or have a pet’s litter box or washing area in this room, you want to plan ahead to make sure there’s enough space.


2. Install spacious countertops in your laundry room design whenever possible.

Anaheim Hills laundry room renovation - laundry room design

A well-designed laundry room will account for all of the tasks you’ll need to do here. This includes having enough room to set down laundry baskets. Or, having enough space to be able to fold and organize a load of clean laundry.

Ideally, you’ll want countertops to be between 24 and 25 ½ inches deep. This will give enough space for the aforementioned tasks but also allow room for a good sized laundry sink if you want one.


3. Include a designated space for laundry baskets or hampers in your laundry room.

laundry room remodeling

While adequate countertop space gives you an area to manage clean laundry, don’t forget about where the dirty laundry will go. Whether you have a rolling hamper or individual laundry baskets, having a designated space for them will keep dirty laundry neatly tucked out of sight. This is especially handy if you have large volumes of laundry that won’t necessarily be completed in one day.


When a load is finished, sorted, and folded, clean laundry can also be put back in those baskets until it is put away. In either case, your laundry room will look and feel less cluttered and will be visually attractive while being fully functional.


4. Install rods or racks for hanging and/or drying clothes.

Laguna-Hills-laundry-room-remodel

If you have multiple clothing items that require hanging to dry, be sure to include this feature in your laundry room. Some homeowners choose a built-in drying rack. Others don’t need to hang-dry clothes. So, they just have a single bar for hanging clean clothes when they come out of the dryer. Just think – that could mean less ironing to do!


5. A Multi-purpose laundry room design may need custom storage solutions.

Remember when we asked what else you intended to use your laundry room for? Your answer to that question can help guide what types of storage solutions you need. If you’re simply handling everyday laundry, upper and lower cabinets could meet your needs just fine. And, depending on your ironing habits, you may choose to have a fold-out ironing board or a cabinet built for housing a full-size ironing board.


If you opted for  storing the vacuum cleaner, broom, mop, and other cleaning supplies in your laundry room, it’s possible that some custom cabinets may be in order. That way, you can maximize the use of the space you have while keeping everything looking neat and tidy.


If you decided that you want to include a custom pet washing station like the one below, you’ll also need storage for both laundry AND bathing supplies.

Dog-wash-room-with-porcelain-tile-in-remodel


6. Outfit your laundry room with fixtures and finishes that will stand the test of time and use.

Amalfi-blue-maple-cabintes-in-laundry-room-renovation - laundry room design

Let’s face it … your laundry room will get a LOT of use. Work with your remodeling professional to determine which materials will still look and feel great even after significant exposure to everyday use and traffic. Ultimately, you’ll want to consider ones that don’t scratch, scuff, or smudge easily.


7. Conceal plumbing for a clean look.

Laundry-room-addition-renovation-cost

Even with the highest quality fixtures, neatly organized cabinets, and beautiful countertops, you won’t be happy with your laundry room design if it’s cluttered by dryer vents or washing machine hoses. Work with your design professional to conceal hoses, drains, vents or anything else that might detract from the overall design.


Plan Your Laundry Room Design With an Orange County Remodeling Professional

At Sea Pointe Design & Remodel, we’ve been helping Orange County homeowners with their remodeling needs for almost 40 years. From luxurious master bathroom renovations and kitchen makeovers to laundry room remodels and other projects, we’re committed to designing and creating spaces you and your family will love.


To learn more about our work, check out our portfolio of completed projects. Or, register for one of our upcoming remodeling webinars to learn helpful remodeling tips from the pros.


Then, when you’re ready to start planning your own laundry remodel, simply give us a call at (949) 861-3400 or fill out the form below to schedule your complimentary design consultation.

Let's Discuss Your Next Project!

  • This field is for validation purposes and should be left unchanged.
  • We guarantee 100% privacy for all information!


Laundry Room Design Must-Haves Combining Looks & Function was last modified: December 11th, 2025 by Smart Marketing
7 Helpful Kitchen Island Design Tips

7 Helpful Kitchen Island Design Tips

Kitchen Island DesignWhether your kitchen is large or small, your kitchen island design can make all the difference in the entire room’s efficiency.


For example, if the island is too small, it may not contain everything you need, like storage options or adequate countertop space. On the other hand, if it’s too big, the island may be cumbersome to walk around, and it could impede traffic flow.


Other than size, there are many other factors to consider, too. With that in mind, let’s look at some key components that will significantly impact your kitchen island design and its usefulness.


7 Factors to Consider for the Ultimate Kitchen Island Design

As you plan your kitchen remodel, pay attention to these important areas to ensure you end up with the best island for your space.


1. Island size matters, but it’s not the same for every kitchen.

Kitchen island designWhether you’ve looked up kitchen island design ideas on Pinterest or simply seen a variety of islands in other people’s homes, you’ve probably noticed that each one is different. That’s because every kitchen is different, and so is the family that uses it.


When it comes to kitchen island design, you might be inclined to think that bigger is better. However, that’s only true if the space allows for that. If you have a small kitchen, a big island may actually make the room feel smaller and interfere with efficient traffic flow and use of the space.


The best solution here is to work with a professional kitchen designer who can help you determine the right sized island for the square footage you have. And, if you’re doing a complete kitchen remodel, there may be other design elements that can be altered with an island in mind.


Lastly, if there simply isn’t room for a kitchen island, your designer can provide alternative options so you still get the storage and workspace you need.


2. Identify how big the clearance zone should be.

Kitchen island designDescribed simply, the clearance zone is the space surrounding the island on all sides. Larger spaces allow for people to move past each other and around the island easily. However, efficiency can be compromised if the distance is too great between the island and other elements, such as the stove or cabinets.


In contrast, if the clearance zone is too small, there could be a safety hazard. A perfect example is the dishwasher door. If there isn’t sufficient space to walk past it when open, there’s an increased risk of tripping or injury.


How big should the clearance zone be? According to the National Kitchen and Bath Association, a space between 42 and 48 inches is ideal for work aisles. In reality, you could go as low as 39 inches as long as that adequately meets your needs. The end goal is to have a clearance zone big enough to allow for safe movement around the island but small enough to foster workspace efficiency.


3. For the best kitchen island design, consider what functions your island should have.

Kitchen island designOne of the great things about islands is that they can have many purposes. Some are used for additional storage and countertop workspace. Others include appliances like a cooktop or a built-in beverage fridge. Many also provide seating areas.


With the right design, your island can include one or two of these things or even all of them! You simply need to think about how your island can complement or add to what’s already available in your kitchen. Then, your designer can help you determine the best kitchen island design that meets your needs and maximizes space.


4. Keep your island in proportion to the size of the entire room.

Kitchen island designEven if you physically have the space for a big island, that doesn’t mean it’s the best for your kitchen. While you’re thinking about function and making the island user-friendly, it’s important to keep aesthetics in mind, too. Work with your kitchen designer to determine how big (or small) you can go with your island while keeping the desired look and feel of the room intact.


5. Will your island’s countertop easily fit through the kitchen’s entrance?

Kitchen Island DesignDon’t forget that the countertop for your island could be significantly bigger than the countertop pieces elsewhere in the room. And, it’s likely that you’ll want a solid piece without visible seams. If you don’t consider this ahead of time and the entryway into your kitchen is small, you could encounter a logistics nightmare.


Save yourself some unneeded stress by planning carefully. Fortunately, if you’re working with a professional remodeling company, you won’t have to figure this all out on your own. Nevertheless, it’s an important factor to keep in mind as you plan your kitchen island design and function.


6. If space allows, consider a double island.

Today’s modern homes are often built with bigger kitchens that can accommodate families as well as entertaining. If square footage is not an issue, your kitchen might actually benefit from TWO islands.


Take a look at this Coto de Caza kitchen makeover. One large island would have filled the space. But, it would have been too cumbersome to walk around and the center of it would have been almost unusable. Instead, two islands fit perfectly and create a fully functional and efficient work area.

Kitchen Island Design


7. The best kitchen island design may be NO island at all.

Kitchen island designIf your kitchen’s square footage simply doesn’t allow for an island, don’t despair. There are other options that could give you the same function as an island but without taking up so much space.


For example, consider a moveable kitchen cart, butcher block, or small-scale rolling island. When not in use, they are stored elsewhere but can provide the right amount of storage or workspace when needed.


Get the Best Kitchen Island Design With an Orange County Kitchen Designer

At Sea Pointe Design & Remodel, we’ve been meeting the remodeling needs of Orange County residents for almost 40 years. During that time, we’ve renovated tiny kitchens, expansive kitchens, and everything in between! Regardless of the size of your kitchen, our expert design team is here to help you get what you need while maximizing use of the space you have.


Take a closer look at our work by browsing through our online portfolio of completed projects. Or, register for one of our upcoming remodeling webinars to get helpful remodeling tips from the pros.


Then, when you’re ready to start planning your own remodel, simply give us a call at (949) 861-3400 or fill out the form below to schedule your complimentary design consultation.

Let's Discuss Your Next Project!

  • This field is for validation purposes and should be left unchanged.
  • We guarantee 100% privacy for all information!


7 Helpful Kitchen Island Design Tips was last modified: December 11th, 2025 by Smart Marketing
How to Update a Historic Home While Preserving Its Charm

How to Update a Historic Home While Preserving Its Charm

farmhouse-sink-fountain-valley-remodel - how to update a historic home
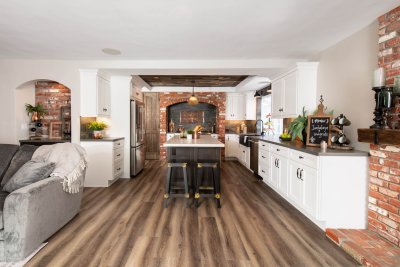
Owning a historic home could be your pride and joy, but does it meet your family’s needs adequately? While your older home is likely full of charm and character, it’s not so likely to have the creature comforts a modern family could be looking for. However, that doesn’t mean you have to forego history for modern construction.


The truth is, it IS possible to update a historic home and bring it into the 21st century. And it can be done without giving up everything you’ve come to love. You simply have to do a little extra planning and work with remodeling professionals who can steer you in the right direction.


5 Key Factors to Consider When You Remodel a Historic Home

1. Renovate your historic home with a ‘safety first’ mindset.

Pop up electrical outlet on grand island - Update a Historic Home

If you have a soft spot in your heart for older things, there’s so much to love about a historic home. But there could be some things lurking behind the walls or hidden in other areas that you wouldn’t love. Things like faulty wiring, lead pipes, a crumbling foundation, or rotting boards.


There’s nothing wrong with wanting to upgrade your older home to have newer features or a more modern feel. But before you get too far into updating aesthetics, be sure to take care of the essentials that affect safety. After all, if faulty wiring leads to a house fire, for example, all the other upgrades you’ve done will be for naught.


2. Keep the charm but update for comfort.

custom-hood-with-reclaimed-wood-over-slide-in-range-and-brass-pot-filler - Update a Historic HomeWhile historic homes exude charm and character, they may not have all the comforts you want your family to enjoy today. Perhaps the kitchen is too cramped for entertaining or the bathrooms are too tiny. And, maybe the home looks great but feels stifling in the summer due to lack of adequate air flow.


If you work with remodeling experts, all of these things (and more) can be updated to make your home more comfortable without sacrificing charm. It’s often possible to install a modern HVAC system hidden behind historic details so you can enjoy the benefits of central heating and cooling. And, smaller rooms can be combined to create bigger, more open living spaces. Simply work closely with your professional remodeling team to decide what needs to stay and what can be removed to get what you need while preserving your home’s charm.


3. Repurpose historic pieces to keep your home’s character.

Castaway-tub-in-home-renovation - Update a Historic HomeIt’s possible that your remodeling plan will include completely gutting the kitchen, bathroom, or other rooms to replace wiring, plumbing, or other essentials. That doesn’t mean that your home’s unique character has to go out the window, too, however. Sometimes, saving items like antique drawer pulls or a vintage washstand and repurposing them in other ways can be the key to making your newly updated historic home keep its historic feel.


4. Repair or replace historic details you want to keep.

Duplicated Dropped Ceiling and Crown Molding After Wall Removal for Matching Design in RemodelIf you’re living in a historic home, it’s highly likely that you purchased it in the first place because you love its character. When upgrading for function, comfort, or aesthetics, though, pay attention to what creates that character you love. Maybe it’s the crown moldings or the hardwood floors. Whatever it is that you love, make sure your remodeling design keeps that intact.


Of course, those historic details you want to keep may not always be in top notch condition. That’s when it’s time to look at what it will take in terms of time and money to repair or replace them. If repair is not an option, it’s often possible to find a local artisan who can replace the feature with something new that’s built to look old.


5. Be prepared for the unexpected – renovating a historic home almost always comes with surprises!

Kitchen remodel in Lake Forest with GemCore flooring - How To Choose The Right FlooringThroughout our almost 40 years of remodeling in Orange County, we’ve learned this … always expect the unexpected when you’re doing home renovations. This is one of the key reasons why we have our clients include an extra line item in their remodeling budget for ‘contingencies’. Basically, the idea is that you determine how much your remodel will cost. Then, add into your budget another 10-20 percent as a buffer to handle whatever comes up that wasn’t in your original plan.


Upgrading a historic home is no different. In fact, if it hasn’t been renovated in years, it may even be more susceptible to surprises than the average home. Whether it’s old wiring that needs to be replaced or a rotting subfloor that rears its ugly head, plan ahead for hidden surprises that could significantly affect your budget. And who knows … maybe you’ll encounter a GOOD surprise, like beautiful wood floors that have been covered up for decades!


Work with the Orange County Remodeling Experts to Update Your Historic Home

Whether you own a historic home or a newer model, Sea Pointe Design & Remodel is proud to be your source for professional remodeling in Orange County. We’ve been helping Orange County homeowners turn their remodeling ideas into reality for almost 40 years and we’d love to help with your home remodeling project.


Take a look at our online portfolio of completed projects to learn more about our work. Or, register for one of our upcoming remodeling webinars to learn helpful remodeling tips from the pros.


Then, when you’re ready to start planning your remodeling project, call us at (949) 861-3400 or fill out the form below to schedule your complimentary design consultation.

Let's Discuss Your Next Project!

  • This field is for validation purposes and should be left unchanged.
  • We guarantee 100% privacy for all information!


How to Update a Historic Home While Preserving Its Charm was last modified: December 11th, 2025 by Smart Marketing
Top Bathroom Design Ideas for 2026 and Beyond

Top Bathroom Design Ideas for 2026 and Beyond

Walk-in shower with modern design

The bathroom, though often overlooked compared to larger rooms in the home, is an essential space for personal well-being and luxury. No longer just a place for quick freshening up, the bathroom has transformed into a private retreat where you find comfort, style, and functionality. Plus, it adds significant value to the home, making it an important element in modern interior design.


So, when considering a remodel or planning future upgrades, knowing the top bathroom design ideas for 2026 can help you create a modern and timeless space. This article walks you through the biggest bathroom trends for 2026 and beyond.


1. Sustainable Bathroom Designs


Sustainability continues to shape every corner of home design, and bathrooms are no exception. Hence, one of the top bathroom design ideas for 2026 is incorporating eco-friendly materials and features.


Eco-friendly materials like bamboo flooring, recycled glass countertops, and low-impact ceramic tiles are great choices. Additionally, water-saving features, such as dual-flush toilets and low-flow showerheads, help conserve water and reduce utility bills.


Radiant heating systems keep your bathroom cozy without wasting energy. And LED lighting brightens up the space in an energy-efficient way. These upgrades prove that you don’t have to sacrifice style to be environmentally responsible.


2. Tech-Enhanced Bathrooms


31-shower-bench-and-niche-with-linear-drain-smartconnect-rainshower-head-with-handshower-and-remote-in-chrome


Many are adding technology into their bathrooms, transforming these spaces into hubs of convenience and luxury. These consist of smart showers that automatically adjust the temperature and bathtubs you can fill through an app before stepping in.


Intelligent mirrors with built-in lighting, defogging capabilities, and the ability to display the weather offer convenience and improved visibility for daily routines. Then, there are voice-activated fixtures that control lighting, music, and even water temperature. These bathroom technologies make your daily routine feel seamless and modern.


3. Wellness-Centric Spaces


Bathrooms are now becoming personal spas that promote relaxation and wellness. Features like rainfall showerheads, steam rooms, and soaking tubs make your bathroom feel like a luxurious retreat. Adjustable LED lighting helps create a calming atmosphere perfect for unwinding after a long day.


Rainfall fixture and geometric tile design in Mission Viejo bathroom remodel


At the same time, adding built-in features that diffuse essential oils or play soothing sounds can improve the overall ambiance. A wellness-focused bathroom does more than look good—it enhances your well-being.


4. Minimalist and Modern Aesthetics


When it comes to bathroom design, sometimes less is more. Clean lines and tidy spaces contribute to a modern, minimalist atmosphere. Floating vanities, wall-mounted toilets, and frameless glass showers add a sleek look.


Minimalistic earthy Newport Coast bathroom remodel


Neutral palettes like soft beige, taupe, and white keep the space calming and timeless. And built-in storage options, like recessed shelves, keep toiletries out of sight and maintain a clean aesthetic. Minimalist bathroom designs prove that simplicity can be stunning.


5. Bold Design Elements


Bold designs are a popular choice if you want to make a statement in bathroom design. These striking elements can enhance the overall aesthetic and create a memorable space. Use eye-catching tiles with geometric patterns or bold colors for your floors or walls.


Geometric-pattern-style-flooring


Choose unique finishes like brushed gold, matte black, or copper for your faucets and handles. Adding textured surfaces, such as natural stone or Venetian plaster, also adds drama to your bathroom. Bold elements allow you to showcase your personality while keeping the design balanced.


6. Nature-Inspired Bathrooms


Bringing the outdoors inside is a trend that’s continuing to gain momentum. Nature-inspired bathrooms create a calming, earthy atmosphere. Incorporate greenery, such as potted plants or living walls, into your bathroom.


You can also use large windows, skylights, or even outdoor showers to blur the lines between your bathroom and nature. Opt for materials like river rock, slate, and reclaimed wood for texture and warmth. Designs like these connect you to nature, even in the most modern homes.


7. Universal and Accessible Design


Accessibility is a growing focus for homeowners, and it involves creating designs that adapt to your changing needs and keep your bathroom functional for years to come.


33-widened-hallway-for-aging-in-place


Features like zero-entry showers provide a seamless look while accommodating all ages and abilities, and easy-to-use faucets and grab bars ensure safety without compromising style. Accessible designs prove that beauty and practicality can coexist.


8. Personalized Bathrooms


Personalization plays a crucial role in designing a bathroom that reflects your style and preferences. Incorporating personal touches and unique elements allows you to create a space that truly feels like yours.


Tailor your vanity to your storage and style needs and add art, bespoke lighting, or vintage pieces to make the space your own. Combine a bathroom with a laundry or makeup station to maximize functionality. Personalized details ensure your bathroom reflects your unique taste and lifestyle.


Summary


The top bathroom design ideas for 2025 are all about sustainability, technology, wellness, bold elements, and personalization. These trends not only make your bathroom beautiful but also enhance your everyday life.


With four decades of experience, Sea Pointe Design & Remodel specializes in creating beautiful and elegant bathrooms. Our team handles every detail from concept to completion, ensuring your project is stress-free and stunning. Let us help you create a bathroom that’s both functional and fabulous. Contact us today to start designing the bathroom you’ve always wanted.


FAQs


What are the top bathroom design trends for 2026?

The top trends include sustainable materials, tech-enhanced features, wellness-focused designs, minimalist aesthetics, and nature-inspired elements.


How can I make my bathroom more eco-friendly?

Use water-saving fixtures, energy-efficient lighting, and sustainable materials like bamboo or repurposed wood.


Are smart bathrooms expensive to install?

Smart features can vary in cost, but many options, like LED mirrors or voice-activated fixtures, are becoming more affordable.


How do I create a spa-like bathroom at home?

Incorporate features like a rainfall shower, mood lighting, and aromatherapy systems to enhance relaxation.


Why should I hire a professional for my bathroom remodel?

Professionals like Sea Pointe Design & Remodel ensure quality craftsmanship, save you time and stress, and help bring your vision to life.

Let's Discuss Your Next Project!

  • This field is for validation purposes and should be left unchanged.
  • We guarantee 100% privacy for all information!


Top Bathroom Design Ideas for 2026 and Beyond was last modified: January 19th, 2026 by Smart Marketing